
Lawn
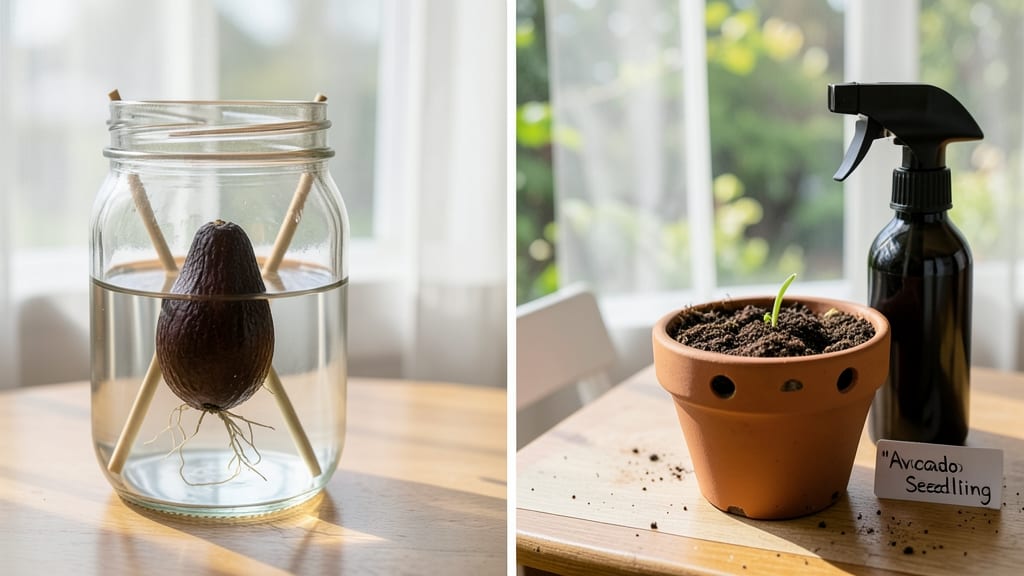
Preparing an avocado seed for planting turns kitchen scraps into a living houseplant that actually works. 🌱 I’ve sprouted avocado pits every year since my first attempt—now I’ll show you the exact method that gets roots in under two weeks without mold or rot.
Start by cleaning the pit thoroughly after removing the flesh, then choose your rooting method: water (classic), damp paper towel (fastest), or soil (most stable). The key is patience—roots appear in 3-6 weeks, but consistency with moisture and warmth is everything.
Once you see roots, transplant into soil and watch as your seedling grows into a 6-foot-tall tree over time. The best part? Every step uses what you already have at home. For slow starters, check moisture levels and light exposure—avocados hate soggy bottoms.
With this method, even black thumbs will succeed.
📚 In This Guide
- What you need
- Instructions
- Tips and common mistakes
- Wrapping up and next steps
What you need
- ● Avocado pit (seed): Fresh, firm, and free of cracks or mold (1 per plant).
- ● Toothpicks or skewers: 3–4 wooden toothpicks (or plastic skewers) for balancing the pit.
- ● Small glass or jar: A clean, clear glass with a narrow neck (e.g., a mason jar or drinking glass) to hold the pit.
- ● Water: Room-temperature, filtered water (enough to submerge the bottom ⅓ of the pit).
- ● Paper towels or coffee filters: 2–3 sheets to line the jar and absorb excess moisture.
- ○ Scissors or knife: For trimming toothpicks to size (optional but helpful).
- ● Hydrogen peroxide (3%): A few drops to disinfect the pit and water (prevents mold).
- ● Spray bottle: For misting the pit occasionally (keeps it hydrated without over-saturating).
- ● Rubber band or jar lid: To secure the toothpicks if they wobble.
- ● Notebook or marker: To label your jar with the planting date (track progress like a pro!).
- ● Planting pot (4–6 inches deep): With drainage holes for transplanting later (e.g., terracotta or plastic).
- ● Potting soil: Well-draining, seed-starting mix (or a blend of peat moss and perlite).
Step-by-Step guide to preparing avocado seeds for planting
This quick method turns kitchen scraps into a living plant—no special tools needed.
🪴 Step 1: Extract and Clean the Seed
Cut an avocado in half lengthwise and twist to separate the seed from the flesh. Rinse the seed under lukewarm water to remove any remaining fruit pulp—this prevents mold later. Use a spoon to gently scrape away any soft brown tissue clinging to the seed's sides.
Here's the thing—don't worry if the seed looks a little rough around the edges. The hard, smooth sides are where roots will emerge, and the pointed top is the stem. I always check for cracks or soft spots that might indicate spoilage. If the seed feels mushy in any area, skip it—it won't sprout.
✂️ Step 2: Insert Toothpicks for Suspension
Place the seed on a paper towel and position 3 toothpicks around the middle, spaced evenly. The toothpicks should pierce the seed about ½ inch down from the top—this keeps it stable when suspended. If the toothpicks slip, press them in slightly deeper until they hold firm.
I like to use white toothpicks because they're sturdy and easy to see against the seed. Black or colored toothpicks work too, but you'll need to be extra careful when checking for root growth later. Balance the seed carefully over a glass or jar filled with 1-2 inches of water—just enough so the bottom ⅓ of the seed touches the water.
💧 Step 3: Position for Root Growth
Place the suspended seed in a bright spot with indirect light—like a windowsill away from direct sun. The water level should stay just below the seed's bottom edge. You'll see roots emerge from the bottom in 2-6 weeks, depending on temperature and humidity. Warmer rooms (around 70-75°F) speed up germination.
Don't let the water level drop completely—keep it topped off so the seed stays hydrated. If the seed starts to smell or the water turns cloudy, dump it and refill with fresh water. This prevents bacterial growth that can rot the seed before roots even appear.
🌱 Step 4: Transition to Soil When Roots Are 2-3 Inches Long
Once roots reach 2-3 inches, it's time to plant. Fill a 6-inch pot with well-draining potting mix (I use a blend of potting soil and perlite). Make a small hole in the center and gently lower the seed so the roots spread downward and the top half remains above soil level.
Press the soil lightly around the seed to secure it, but don't pack it down too firmly. Water lightly until moisture seeps from the drainage hole. Place the pot in bright, indirect light again—direct sun can scorch the young plant. Within 4-6 weeks, you should see the first leaves unfurl from the top.
☀️ Step 5: Gradually Introduce Direct Sunlight
After the first true leaves appear, move the pot to a spot with morning sun and afternoon shade. This slows the transition and prevents leaf burn. Over 1-2 weeks, gradually increase direct sunlight exposure until the plant can handle 4-6 hours of full sun daily.
Real talk: Your avocado tree won't produce fruit for years (if ever), but that doesn't mean it's not worth growing. The process is satisfying, and the plant adds life to any space. Keep the soil lightly moist—never soggy—and fertilize lightly every 2 months with a balanced houseplant fertilizer.
Tips & tricks for perfect avocado seed planting
Turn your kitchen scraps into a thriving plant with these game-changing insights that'll keep your avocado seed on track.
Seed Selection: Choose seeds from fully ripe avocados—these have the highest germination rates. I always test the seed's readiness by gently squeezing it; if it feels firm with no give, it's a good candidate. Avoid seeds from store-bought avocados that may have been treated to prevent sprouting.
Water Level Watch: The key to successful root growth is maintaining that 1-2 inch water level in Step 3. I like to use a clear jar so I can easily monitor the water without disturbing the seed. Change the water every 2-3 days to prevent bacterial growth—cloudy water is your first warning sign that something's off.
Lighting Strategy: While indirect light is ideal, don't worry if your only option is direct light—just position the seed 2-3 feet from the window. The critical factor is avoiding direct sun on the seed itself, which can overheat it. A north-facing window works perfectly, but east or west exposures will also work if you adjust the distance accordingly.
Soil Transition: When your roots hit that 2-3 inch mark in Step 4, don't rush to plant! Wait until they're 3-4 inches long for better stability. I like to gently swirl the seed in the water to encourage root spread before planting. Use your finger to create a small pocket in the soil—this helps guide the roots downward naturally.
Pro Tips for Prepare An Avocado Seed For Planting
- Turn your kitchen scraps into a thriving plant with these game-changing insights that'll keep your avocado seed on track.
- Seed Selection: Choose seeds from fully ripe avocados—these have the highest germination rates.
- Water Level Watch: The key to successful root growth is maintaining that 1-2 inch water level in Step 3.
Frequently asked questions
Got questions about growing your own avocado tree from a seed? You’re not alone! Here are some of the most common queries—and straightforward answers—to help you get started with confidence.
How long does it take for an avocado seed to sprout?
Patience is key! With the right conditions (warmth, moisture, and indirect light), your avocado seedling should sprout roots within 2–6 weeks and tiny leaves in 4–8 weeks. Keep the soil consistently damp but not soggy—consistency speeds up the process!
Can I plant an avocado seed directly in soil without the water method?
Yes, but the water method (soaking in a jar) gives you better control over root growth and lets you monitor progress. If you skip the jar, plant the seed halfway in moist potting mix, cover it lightly with soil, and keep it warm. Just be ready to transplant carefully once roots appear!
What if my avocado seed never sprouts? Did I do something wrong?
Don’t stress! Some seeds take longer—or may never sprout if they’re old or damaged. Try these fixes:
- Check for rot (mushy, foul-smelling seed = too much water).
- Ensure the seed stays in warmth (70–80°F)—cool drafts slow growth.
- Use a fresh seed (older seeds lose viability).
How big should my avocado seedling be before transplanting to a pot?
Aim for a seedling with at least 6 inches of roots and 2–3 small leaves before moving it to a pot. Use well-draining soil and a container with drainage holes. Harden it off for a week by placing it outside (in shade) to adjust to outdoor conditions.
Can I eat the avocado from a tree grown from seed?
Technically yes, but not the same as store-bought! Seed-grown avocados may take 10+ years to bear fruit, and the flavor/texture can vary wildly. For consistent, delicious avocados, grafting (a horticultural technique) is used commercially. Grow yours for the fun and shade—or save seeds from high-quality avocados!
Wrapping up and next steps
Preparing an avocado seed for planting is a simple, rewarding way to grow your own plant—and it’s completely zero-waste! With just a few tools and 10 minutes of effort, you can kickstart a thriving avocado tree from something you’d normally toss.
Whether you’re a green thumb or a curious beginner, this method makes it easy to turn kitchen scraps into a living, breathing plant. 🌱
Now that you’re ready, why not take the next step? Grab your seed, follow the steps, and watch your tiny sapling grow into a lush, leafy friend. Share your progress with fellow plant lovers—you’ve got this!