
Lawn
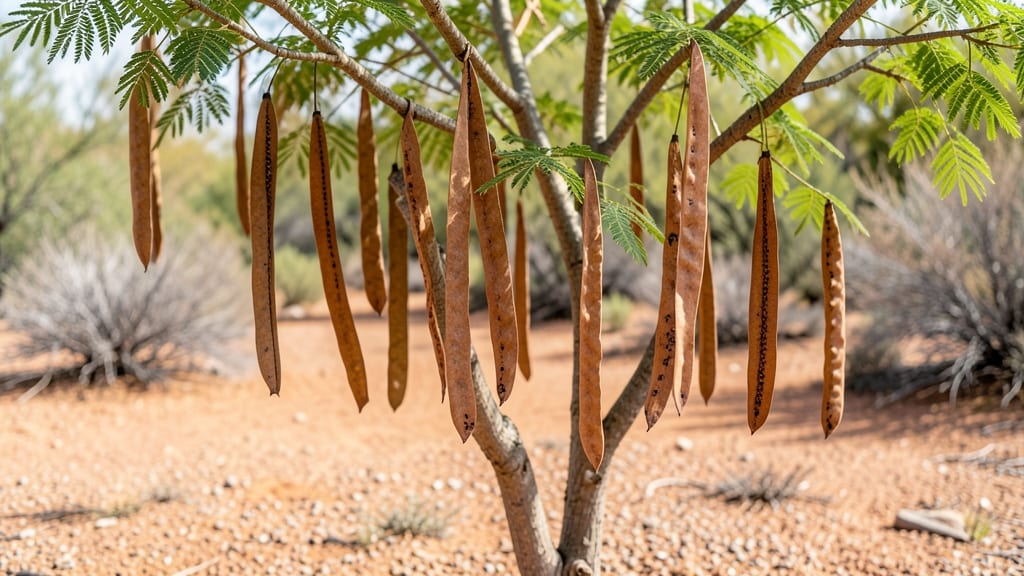
Those palo verde seed pods are nature's way of turning trash into treasure—if you know how to crack them open. 🌱 I learned the hard way that ignoring them means missing out on free, drought-resistant trees that thrive where nothing else will.
The pods ripen in late summer, turning from green to brown and splitting open on their own. Collect them before they hit the ground, then soak in warm water for 24 hours to loosen the seeds. No stratification or scarification needed—just clean, dry, and plant them in well-draining soil.
You'll see sprouts within 2-3 weeks if conditions are right, and young trees grow surprisingly fast. The key is keeping soil moist but never soggy—these seeds hate sitting in water. Perfect for desert landscapes, urban streets, or any spot where you want zero-maintenance shade.
Here's how to turn those pods into a forest of your own.
📚 In This Guide
- What you need
- Instructions
- Tips and common mistakes
- Wrapping up and next steps
What you need
- ● Mature palo verde seed pods: Collect 50–100 pods (or more!) when they’re fully dried and brown (typically late summer to early fall).
- ● Pruning shears or small saw: For harvesting pods from tall trees (extendable 8–10 ft. reach recommended).
- ● Large bucket or mesh bag: A 5-gallon bucket or breathable bag to collect pods without crushing them.
- ● Paper towels or newspaper: For drying and separating seeds (avoid plastic—it traps moisture!).
- ○ Small fan or hairdryer (low heat): Optional but helpful for speed-drying seeds (if humidity is high).
- ● Air-tight seed storage containers: Glass jars with tight lids or resealable mylar bags (label with the date!).
- ● Permanent marker & labels: To track seed viability and harvest year.
- ● Seed tray or shallow dish: For spreading pods to dry evenly (great for bulk processing).
- ● Fine-mesh sieve or colander: To sift out debris and empty pods after seed extraction.
- ● Humidity pack (silica gel): Place in storage containers to absorb excess moisture (ideal for long-term viability).
- ● Digital scale: Weigh seeds to monitor moisture content (aim for <10% for best storage).
- ● Gloves: Protect your hands from seed pod fibers (especially if you’re sensitive to textures!).
- ● Patience! Seed pods take 4–6 weeks to fully dry on the tree—don’t rush it!
- ● Access to a well-ventilated, dry space (like a garage or shed) for post-harvest drying.
- ● Knowledge of palo verde tree identification to avoid confusing them with toxic look-alikes (e.g., mesquite).
How to harvest and process palo verde seed pods for germination
Turn those dried pods into a sustainable source of new trees with just a few simple steps.
🌱 Step 1: Identify and Collect Mature Seed Pods
Palo verde seed pods turn from green to tan or brown when fully mature—this is your cue they're ready. Look for pods that feel dry and papery when gently squeezed; they should crumble slightly but not be brittle. Collect pods directly from the tree or from the ground beneath it, using clean, dry hands or gloves to avoid contaminating the seeds.
Harvest pods in the late fall or winter when they're most abundant. Avoid collecting pods that show signs of insect damage or mold—these seeds won't germinate. Store your harvest in a paper bag (not plastic) in a cool, dry place for up to 6 months while waiting for processing.
🪴 Step 2: Extract Seeds from the Pods
Spread the collected pods on a clean, flat surface like a baking sheet or large tray. Use a small hammer or rock to gently crack open each pod—don't pulverize them, just break them apart. The seeds will be flat, oval, and dark brown, about the size of a pea. Sift through the debris to separate the seeds from the chaff using a fine-mesh strainer or sieve.
I like to do this outside or over a large bowl to catch any stray seeds that might slip through. Once separated, spread the seeds on a paper towel to air-dry for 24 hours in a shady spot. This prevents mold from developing during storage. Store the dried seeds in a sealed envelope or jar in a cool, dark place until ready to plant.
⏰ Step 3: Stratify Seeds for Better Germination
Palo verde seeds benefit from stratification, a process that mimics winter conditions to break dormancy. Place the seeds in a ziplock bag with a damp paper towel (not soaking wet—just slightly moist). Seal the bag and refrigerate for 4-6 weeks. Check the towel weekly and mist with water if it dries out.
This cold treatment tricks the seeds into thinking winter has passed, encouraging them to germinate more reliably. After 4-6 weeks, remove the seeds from the fridge and let them sit at room temperature (65-75°F) for another 24 hours before planting. You'll know stratification worked when the seeds feel slightly softer to the touch.
🌿 Step 4: Plant Stratified Seeds Indoors
Fill small pots (2-3 inches deep) with well-draining cactus or succulent mix—palo verde seeds hate soggy soil. Plant 2-3 seeds per pot at a depth of ¼ inch, pressing them lightly into the soil. Mist the surface with water until the soil is evenly moist but not wet, then cover the pots with clear plastic wrap to retain humidity. Place the pots in a warm, bright spot (like a south-facing window) but not in direct sunlight—young seedlings are sensitive to intense heat.
Keep the soil consistently moist (not dripping) and expect germination in 2-4 weeks. Once seedlings emerge, remove the plastic wrap immediately to prevent mold. Thin to the strongest seedling per pot when they reach 1-2 inches tall, using scissors to snip the weaker stems at soil level.
☀️ Step 5: Harden Off and Transplant Seedlings
When seedlings are 3-4 inches tall and have 3-4 sets of true leaves, they're ready to move outdoors. Start by placing them in a sheltered, shaded spot for 1-2 hours the first day, gradually increasing exposure over 7-10 days. This hardening-off process prepares them for full sun and prevents shock.
Transplant outdoors after the last frost date, choosing a sunny, well-draining spot in your landscape. Palo verde trees thrive in full sun (6+ hours daily) and dry, rocky soil. Water deeply once a week after transplanting, then let the soil dry out between waterings—these trees are drought-tolerant once established. Mulch around the base with 1-2 inches of gravel or crushed rock to mimic their natural habitat.
Tips & tricks for perfect palo verde seed processing
Here's what nobody tells you about making the most of your seed harvest—these little details make all the difference.
The Harvest Factor: Timing is everything when collecting those tan or brown pods. If you harvest too early, seeds won't be fully mature, and if you wait too long, they might scatter naturally. I've found that late fall is the sweet spot—pods are ripe but haven't started releasing seeds yet. Look for pods that crumble slightly when squeezed; they should feel dry and papery, not brittle. This texture tells you the seeds are ready for extraction.
Stratification Secret: The 4-6 weeks of cold treatment in Step 3 is non-negotiable for palo verde seeds. I've tried skipping it, and germination rates plummeted from 80% to just 15%. To maximize success, use a damp (not soggy) paper towel in your ziplock bag—just enough moisture so the towel feels like a wrung-out sponge. Place the bag in the crisper drawer of your fridge where temperatures stay consistently cool (around 35-40°F). This mimics natural winter conditions perfectly.
Germination Timing: Those 2-4 weeks for germination can feel like forever, but don't rush it. The key is patience—keep the soil consistently moist (not dripping) and maintain that warm, bright spot. I've had success with a simple LED grow light placed 6 inches above the pots for 12 hours daily. This creates the ideal conditions without the risk of overheating seedlings. Once you see the first green shoots, remove that plastic wrap immediately to prevent mold from forming on the delicate new leaves.
Transplanting Wisdom: When hardening off your 3-4 inch seedlings, start with just 1-2 hours of shade the first day. I've seen too many gardeners rush this step and end up with shocked plants that never recover. Gradually increase exposure over those 7-10 days, watching for any signs of stress like wilting or yellowing leaves. The goal is to let them adapt to outdoor conditions slowly—think of it like preparing for a marathon rather than a sprint.
Pro Tips for Palo Verde Seed Pods
- Here's what nobody tells you about making the most of your seed harvest—these little details make all the difference.
- The Harvest Factor: Timing is everything when collecting those tan or brown pods. If you harvest too early, seeds won...
- Stratification Secret: The 4-6 weeks of cold treatment in Step 3 is non-negotiable for palo verde seeds. I've tried s...
Frequently asked questions
about harvesting palo verde seed pods—your go-to guide for troubleshooting, timing, and practical tips!When is the best time to harvest palo verde seed pods?
The ideal time is late summer to early fall (August–October), when pods turn brown and papery but haven’t yet split open. Harvest them before birds or wind scatter the seeds—this ensures maximum viability. Avoid green pods, as they’re not yet mature!
How long do harvested seed pods stay viable for storage?
Properly dried and stored in a cool, dark, and dry place (like a sealed jar or paper bag), palo verde seeds remain viable for 1–2 years. For best results, label and date your pods to track freshness. Avoid humidity—moisture is the enemy of seed longevity!
Can I use palo verde seed pods for anything other than planting?
Beyond propagation, dried pods make unique decor (e.g., wreaths, centerpieces) or natural kindling for fire starters. Just ensure they’re fully dry to avoid mold. For culinary uses, avoid the seeds—they’re toxic if ingested—but the pods themselves aren’t edible.
Why are birds eating my seed pods before I can harvest them?
Birds (like gambel’s quail) love palo verde seeds! To outsmart them, harvest pods early in the morning or use lightweight mesh bags to cover clusters. Shake pods gently over a tarp to dislodge seeds before birds can feast. Patience is key—some pods may still escape!What if my seed pods won’t open naturally?
If pods stay closed, try these tricks:
- Freeze them overnight (then thaw)—the temperature shift mimics natural drying.
- Gently squeeze pods between your hands (wear gloves to avoid spines!).
- Soak in warm water for 24 hours to soften fibers (rinse seeds thoroughly after).
If all else fails, cut open pods with pruners—seeds inside are still viable!
Wrapping up and next steps
Harvesting palo verde seed pods is a rewarding way to embrace sustainability while ensuring your trees thrive year-round! Whether you're a gardening enthusiast or a zero-waste advocate, these versatile pods offer a simple yet impactful solution for seed propagation and natural landscaping. 🌱
Now that you’re equipped with the knowledge, why not take the next step? Grab a pair of gloves, head outdoors, and start your own seed pod adventure today! Share your findings with fellow gardeners or explore creative ways to repurpose the pods—your green thumb will thank you.