
Lawn
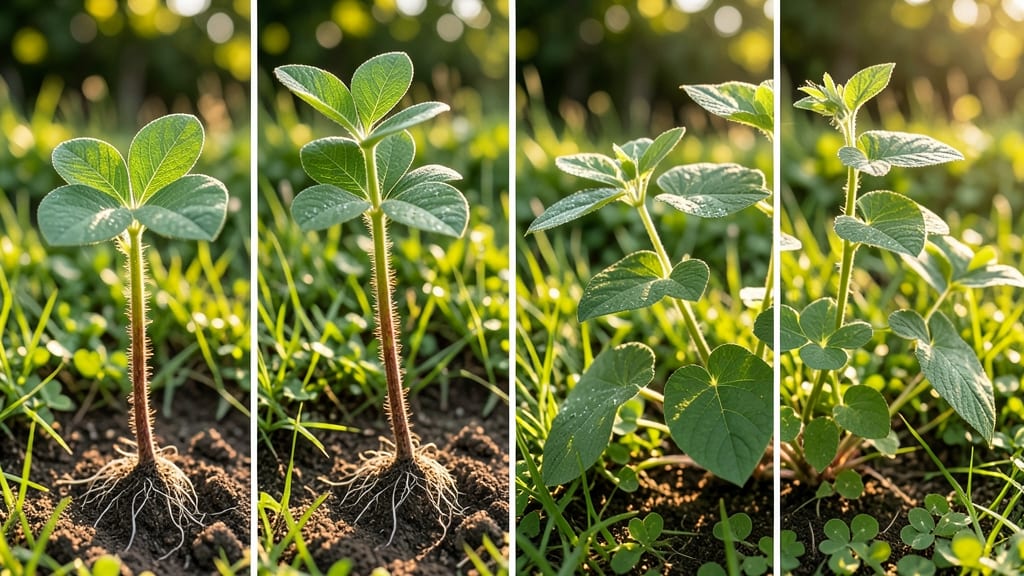
The seed stages of growth reveal a plant’s hidden journey from tiny speck to towering life. 🌱 I’ve watched seeds transform from dormant specks into thriving plants, and the first signs of life—those delicate sprouts—are the most exciting part of gardening.
Understanding each phase helps you nurture plants with confidence, whether you’re growing vegetables, flowers, or lawn grass.
Germination kicks off when moisture triggers the seed to split open, sending down a root and up a shoot. This stage lasts days to weeks depending on the plant—cool weather slows it down, while warmth speeds it up.
Once the seedling emerges, it enters the vegetative phase, where leaves expand and roots deepen, setting the stage for future growth. Each step requires different care: gentle watering during germination, bright light for seedlings, and nutrient-rich soil as the plant matures.
By the time you see buds forming, you’re in the flowering/fruiting stage, where plants shift energy from growth to reproduction. This is when tomatoes ripen, roses bloom, and lawns thicken—proof that your patience paid off.
The key is adapting care: more water for fruiting plants, pruning to encourage blooms, and protecting young growth from pests. With the right timing, you’ll harvest a bounty that rivals anything you’ve bought at a store.
Troubleshooting delays is easier when you recognize the stage. Stunted seedlings? Check light and soil moisture. No flowers? The plant might need more nutrients or a rest period.
Every garden has hiccups, but knowing these stages turns guesswork into strategy. Ready to grow with intention? Let’s dive into the details that make all the difference.
📚 In This Guide
- What you need
- Instructions
- Tips and common mistakes
- Wrapping up and next steps
What you need
- ● Seed Variety: Choose a high-quality grass seed blend suited to your climate (e.g., Kentucky Bluegrass, Fescue, or Bermuda). Quantity: 5–10 lbs per 1,000 sq. ft. (adjust for seed size).
- ○ Soil Test Kit: To check pH and nutrient levels (ideal range: 6.0–7.0). Optional: Pre-test soil for accuracy.
- ○ Broadcast Spreader: For even seed distribution (manual or walk-behind models work). Optional: Hand-held spreader for small areas.
- ● Topsoil or Compost: ¼–½ inch layer to improve seed contact and moisture retention. Quantity: ~1 cubic yard per 100 sq. ft.
- ● Watering System: Hose with Adjustable Nozzle: For gentle, frequent watering.
- ● Sprinkler: Light mist setting (e.g., oscillating or impact sprinkler).
- ● Rain Gauge: To monitor water depth (aim for ¼ inch/day).
- ● Lawn Rake: Fine-toothed (¼–½ inch spacing) to level soil and cover seeds lightly.
- ● Garden Gloves & Knee Pads: For comfort during prep and planting.
- ● Seedling Fertilizer: Low-nitrogen blend (e.g., 5-10-10) to avoid burning tender sprouts.
- ● Erosion Control Blanket: For sloped areas to prevent seed washout.
- ● Camera or Smartphone: With a macro lens for close-up shots of seed stages (documentation!).
- ● Journal/Notebook: To track watering, weather, and growth milestones.
Seed stages of growth: visual guide to identify key development phases
Watch your seeds transform from dormant to thriving plants—here’s how to spot each milestone.
🌱 Step 1: Identify Dormancy and Initial Moisture Activation
The journey begins with your seed, still dormant but ready to wake. When you first plant, the seed absorbs moisture from the soil, swelling slightly as its outer shell softens. This is where the magic starts—though you won’t see anything yet. The key is consistency: keep the soil evenly moist (not soggy) at 65-75°F for optimal activation.
I always press my finger into the soil to check moisture—it should feel damp like a wrung-out sponge. If the surface dries out, germination slows or stops. This stage can take 12-48 hours for fast germinators like beans, but slower seeds (like tomatoes) may take 3-5 days. Patience here prevents overwatering, which can drown seeds before they even sprout.
🌱 Step 2: Recognize Radicle Emergence (The First True Sign of Life)
Here’s where it gets exciting: the radicle (the embryonic root) breaks through the seed coat, pushing downward into the soil. You’ll spot a tiny white or tan "tail" protruding from the seed—this is your first visual cue. It’s fragile, so avoid disturbing the soil now. The radicle anchors the seedling and begins absorbing water and nutrients.
Radicle emergence usually happens within 3-10 days, depending on the seed type and conditions. I like to use a magnifying glass for close-ups—it’s amazing how this tiny root sets the stage for everything above ground. Once you see this, you’ll know your seeds are alive and growing, even if nothing else has appeared yet.
🌿 Step 3: Spot the Shoot and Cotyledons (The Above-Ground Breakthrough)
The next milestone is the shoot emerging upward, followed by the cotyledons—those first tiny leaves. The shoot looks like a tiny green or purple stem breaking through the soil surface. Cotyledons (often called "seed leaves") unfurl next, providing energy to the seedling until true leaves develop. They’re usually round, thick, and lack the detailed veins of mature leaves.
This stage typically appears 5-14 days after planting, but watch for leggy seedlings (long, weak stems) if light is insufficient. I keep my grow lights 2-4 inches above seedlings to prevent this. True leaves (the second set) will look different—they’ll have distinct shapes and veins, signaling the seedling is transitioning to photosynthesis.
🌱 Step 4: Observe True Leaves and Early Growth (The Transition to Self-Sufficiency)
Once true leaves appear, your seedling has officially left the "baby" phase. These leaves are smaller versions of the adult plant’s foliage, with complex veins and distinct shapes. This is when the seedling starts producing its own food through photosynthesis. You’ll notice the cotyledons may yellow or drop off as the true leaves take over.
True leaves usually emerge 7-21 days after germination, depending on the plant. I pay close attention here—this is when seedlings become vulnerable to overcrowding. Thin them to 1-2 inches apart if needed, or transplant to larger containers. The soil should stay moist but not waterlogged to avoid damping-off (a fungal disease that collapses stems).
⏰ Step 5: Monitor Vegetative Growth and Root Development (The Foundation Phase)
After true leaves appear, focus on vegetative growth—the rapid expansion of stems, leaves, and roots. You’ll see leaves grow larger and more complex, and stems thicken. Roots, though invisible, are busy spreading through the soil. This phase is critical for building a strong plant that can handle transplanting or environmental stress.
I check for healthy growth by looking for vibrant color (no yellowing) and sturdy stems. If leaves grow pale or stretch toward light, it’s time to adjust your grow light or rotate the pot. Most seedlings enter this phase 3-6 weeks after planting, but fast growers (like lettuce) may mature sooner. This is also when you’ll start seeing flowers or buds in fruiting plants—your first hint of the harvest to come.
Tips & tricks for tracking seed development milestones
These practical insights will help you spot each growth phase like a pro—no guesswork required.
Visual Cues Matter: In Step 1, when checking soil moisture, look for subtle changes like the seed's outer shell becoming slightly translucent. This indicates it's absorbing moisture properly. For seeds planted in clear containers, you might even see the seed swell slightly—this is your confirmation that activation is underway.
Lighting for Leggy Seedlings: If you notice seedlings stretching toward light in Step 3, it's time to adjust your grow lights to 2-4 inches above the plants. I've found that rotating the container daily helps prevent uneven growth. Leggy seedlings are a sign your lights are too far away or not providing enough intensity.
True Leaves vs. Cotyledons: The transition in Step 4 is easy to miss if you're not paying attention. Cotyledons (the first leaves) are usually round and thick, while true leaves will have distinct veins and shapes that match the mature plant. I always snap a photo when I see true leaves appear—it's a great reference for future plantings.
Root Development Clues: While you can't see roots in Step 5, healthy above-ground growth is a great indicator. If leaves are vibrant and stems are sturdy, your roots are likely thriving. I gently press on the soil surface—if resistance is strong, roots are developing well. For container plants, check for roots growing through drainage holes as another sign of robust development.
Pro Tips for Seed Stages Of Growth
- These practical insights will help you spot each growth phase like a pro—no guesswork required.
- Visual Cues Matter: In Step 1, when checking soil moisture, look for subtle changes like the seed's outer shell becoming slightly translucent.
- Lighting for Leggy Seedlings: If you notice seedlings stretching toward light in Step 3, it's time to adjust your grow lights to 2-4 inches above the plants.
Frequently asked questions
How long does it take for grass seeds to germinate?
Germination time varies by grass type and conditions. Cool-season grasses (like Kentucky bluegrass) typically sprout in 7–21 days, while warm-season grasses (like Bermuda) may take 10–30 days. Keep soil moist and at the right temperature (50–75°F) for best results. Patience is key—don’t overwater or disturb the soil!
What’s the difference between germination and seedling stages?
Germination is when the seed breaks open and a tiny root (radicle) emerges. The seedling stage begins once the shoot (coleoptile) pushes through the soil, followed by the first true leaves. This transition usually happens within 2–4 weeks after germination, depending on grass type and care.
Why are my seeds not sprouting? Troubleshooting tips.
Seeds may fail to sprout due to dry soil, incorrect temperature, poor seed-to-soil contact, or old seeds. Double-check your watering (keep soil damp, not soggy), ensure temps align with your grass type, and lightly rake seeds into the soil. If seeds are over a year old, they may have lost viability—try fresh ones!
Can I overseed in extreme heat or cold?
Nope! Overseeding in extreme heat (above 85°F) or freezing temps (below 40°F) stresses seeds and reduces germination rates. Aim for cool-season grasses in early fall or spring (50–65°F) and warm-season grasses in late spring or early summer (70–85°F). A soil thermometer helps monitor ideal conditions.
Should I fertilize during the seed stages?
Hold off on heavy fertilizing until after germination! Start with a light, balanced starter fertilizer (high in phosphorus) to encourage root growth, but avoid nitrogen-heavy blends early on. Once seedlings are established (2–4 weeks post-germination), you can switch to a standard lawn fertilizer.
Wrapping up and next steps
Understanding the seed stages of growth in your lawn is the first step to fostering a lush, healthy yard. From germination to early sprouting, each phase plays a crucial role in setting the foundation for a vibrant landscape.
By recognizing these key milestones—like the radicle emergence or coleoptile breakthrough—you’ll be better equipped to provide the right care at the right time.
Now that you’re armed with this visual guide, take action! Start by testing your soil and adjusting conditions to match the needs of your grass seeds. Next steps:
- Plant with confidence, knowing you can spot early signs of success.
- Monitor closely during the critical germination window (usually 7–14 days).
- Celebrate those first green shoots—they’re proof your hard work is paying off! 🌱