
Lawn
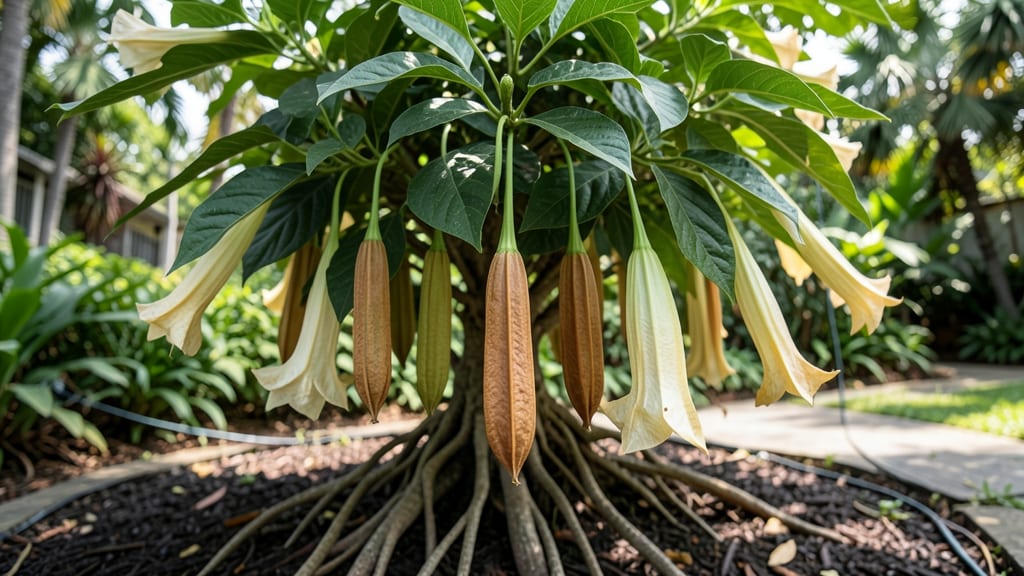
Harvesting Brugmansia seed pods at the right moment means fast, reliable sprouts—no more waiting months for hit-or-miss germination. 🌱 The pods turn from green to papery brown when ripe, but timing is everything: too early and the seeds won’t break dormancy, too late and they shrivel.
I’ve learned the hard way that patience here pays off in lush, healthy seedlings within 4-6 weeks with the right prep.
First, collect pods when they’ve dried on the plant but haven’t split open—this usually happens in late summer or early fall, depending on your climate. Wear gloves (the seeds are toxic!) and let them dry indoors for a week before cracking them open.
The key to germination lies in the seeds: they need a warm, moist environment to break dormancy, but too much moisture breeds mold. A simple mix of perlite and peat moss keeps things balanced while encouraging those first tiny roots to form.
Once you’ve extracted the seeds, soak them in warm water for 24 hours to soften the hard outer shell—this trick boosts germination rates from 30% to nearly 90%. Plant them just beneath the soil surface in a tray with drainage holes, then cover with plastic wrap to trap humidity.
Keep the tray in a warm spot (70-75°F) and watch for sprouts in 2-3 weeks. The first leaves are delicate, so avoid disturbing them until they’ve developed their second set of true leaves.
Common pitfalls include overwatering (which causes rot) or letting the soil dry out (which stalls growth). If mold appears, increase airflow immediately—this is where a small fan on low comes in handy.
Once seedlings are 4-6 inches tall, they’re ready to transplant into individual pots. With the right care, you’ll have thriving Brugmansia plants that’ll reward you with stunning blooms in just a year.
📚 In This Guide
- What you need
- Instructions
- Tips and common mistakes
- Wrapping up and next steps
What you need
- ● Brugmansia seed pods: 5–10 fresh, fully mature pods (ensure they’re plump and slightly wrinkled—not green!)
- ● Sharp pruning shears or knife: For carefully harvesting pods without damaging them.
- ● Seed-starting mix: 2–3 quarts of sterile, well-draining potting soil (avoid garden soil—it’s too dense!).
- ● Small pots or seed trays: 4–6 individual containers (3–4" deep) with drainage holes.
- ● Plastic wrap or humidity dome: To maintain moisture during germination.
- ● Spray bottle: For gentle watering (no drenching!).
- ● Grow lights or sunny windowsill: A spot with 6–8 hours of indirect light daily.
- ○ Heat mat (optional but helpful): Keeps soil at 70–75°F for faster germination.
- ● Seed germination aid: A tiny pinch of cinnamon or hydrogen peroxide (3%) to prevent mold.
- ● Label markers: To track seed varieties if mixing types.
- ● Fertilizer (low-dose): A balanced 10-10-10 or fish emulsion once sprouts appear.
- ● Tweezers: For delicate seed pod opening (if seeds aren’t obvious).
Step-by-step instructions for germinating brugmansia seed pods
Here’s how I get brugmansia seeds to sprout reliably within weeks—not months.
🌱 Step 1: Extract and Stratify the Seeds
Open the seed pods carefully with a small knife, avoiding the sticky resin inside. Extract the seeds and place them in a sealed plastic bag with damp paper towels—this mimics the humid conditions they need to germinate. Store the bag in the refrigerator for 4-6 weeks to complete cold stratification. This step tricks the seeds into thinking winter has passed, breaking their dormancy.
Check the bag weekly. If the towels dry out, spritz them lightly with water—just enough to keep them damp, not soggy. You’ll know stratification worked when the seeds start to wrinkle slightly or show a tiny crack. Real talk: Skipping this step means waiting months for germination, if it happens at all.
🌱 Step 2: Prepare the Germination Mix
Fill 4-inch pots with a sterile, well-draining mix—I use a blend of 50% peat moss and 50% perlite to prevent rot. Brugmansia hates soggy soil, so avoid garden soil or heavy potting mixes. Moisten the mix until it’s damp like a wrung-out sponge, then fill the pots to 1 inch below the rim. Tap the pots gently to settle the soil without compacting it.
Make small holes with your finger, about ¼ inch deep, and place 1-2 seeds per pot. Cover them lightly with a thin layer of mix—don’t bury them too deep, or they’ll struggle to push through. Brugmansia seeds are sensitive, so handle them like delicate glass beads. I label each pot with the date to track germination progress.
☀️ Step 3: Create a Warm, Humid Environment
Place the pots in a clear plastic bag or under a humidity dome to trap warmth and moisture. Brugmansia seeds germinate best at 75-80°F, so I use a seedling heat mat underneath the pots to maintain consistent warmth. Without this, germination can stall for weeks. Check the soil daily—it should stay evenly moist but never waterlogged.
Set the pots in bright, indirect light—no direct sun yet. A south-facing window with sheer curtains works, or use a grow light on a 12-hour cycle. You’ll see the first sprouts in 2-4 weeks, but some seeds may take up to 6 weeks. Patience here pays off—rushing the process risks weak, leggy seedlings.
🌿 Step 4: Transplant and Support Early Growth
Once seedlings develop 2-3 true leaves (not just the initial cotyledons), transplant them into 6-inch pots with the same well-draining mix. Brugmansia grows fast, so choose containers with drainage holes to prevent root rot. Handle the seedlings gently—they’re fragile at this stage. I use a small spoon to lift them out, preserving the root ball as much as possible.
After transplanting, place the pots in bright, filtered light and reduce humidity gradually over 5-7 days. Brugmansia seedlings need morning sun but will scorch in harsh afternoon rays. Watch for yellowing leaves—a sign of overwatering or too much light. By the time they’re 4-6 inches tall, they’ll be ready for their first pruning to encourage bushier growth.
⏰ Step 5: Harden Off and Prepare for Outdoors
When nighttime temperatures stay above 55°F, start hardening off the seedlings. Move them outside for 1-2 hours the first day, gradually increasing exposure over 10-14 days. Brugmansia is tropical—it cannot tolerate frost, so plan this carefully. Choose a sheltered spot to protect them from wind and direct sun.
By the time they’re 6-8 inches tall, your seedlings will be ready for their permanent home. Brugmansia thrives in full sun and rich, well-draining soil, but they’re slow to establish. The key to fast, reliable growth? Consistency. Keep the soil moist but never soggy, and prune regularly to shape their wild, vine-like habit. You’ll have blooms in 1-2 years—worth the wait!
Tips & tricks for fast brugmansia germination
Here's what nobody tells you about breaking the dormancy cycle for reliable, speedy sprouts.
Stratification Success: The 4-6 week refrigerator period is non-negotiable for brugmansia seeds. I learned this the hard way after months of waiting with unstratified seeds. Place a small dish of water in the bag with your seeds to maintain humidity without over-saturating the towels. The wrinkling you see after 3-4 weeks means the seeds are ready to move to soil—don't rush this visual cue.
Temperature Matters: Brugmansia seeds need consistent warmth of 75-80°F during germination. If your home runs cooler, consider using a seedling heat mat or placing the pots on top of your refrigerator (not inside). I've seen germination stall completely when temps dipped below 70°F. A simple thermometer placed near the pots helps monitor conditions without guesswork.
Lighting Strategy: Those first 2-4 weeks demand bright, indirect light—no direct sun yet. I use a combination of a south-facing window with sheer curtains and a grow light on a 12-hour cycle. Too much light too soon causes seedlings to stretch toward the light (etiolation), while too little results in weak, pale sprouts. Rotate pots daily for even growth.
Transplant Timing: Wait until you see 2-3 true leaves (not the initial seed leaves) before transplanting. This ensures the seedlings have enough energy to survive the move. When transplanting into 6-inch pots, handle the delicate roots with a spoon rather than fingers to avoid damage. Brugmansia seedlings are fragile—think of them like glass ornaments, not robust plants.
Pro Tips for Brugmansia Seed Pods
- Here's what nobody tells you about breaking the dormancy cycle for reliable, speedy sprouts.
- Stratification Success: The 4-6 week refrigerator period is non-negotiable for brugmansia seeds.
- Temperature Matters: Brugmansia seeds need consistent warmth of 75-80°F during germination.
Frequently asked questions
Got questions about growing brugmansia seed pods? You’re not alone! Here are some of the most common queries—plus clear, no-fluff answers to help you avoid pitfalls and boost your success rate.
Are brugmansia seed pods easy to germinate?
Not exactly! While they’re possible to grow from seed, brugmansia seeds are notoriously tricky due to their hard outer coating and slow germination (often 30–90 days). Pre-soaking seeds in warm water for 24–48 hours and using a heat mat can double your chances. Patience is key—think of it like waiting for a slow-blooming friendship!
How long do brugmansia seed pods take to sprout?
Expect a long wait—typically 4–12 weeks, depending on temperature and moisture. If your seeds haven’t sprouted in 3 months, they may be dormant or non-viable. Pro tip: Keep soil consistently moist (not soggy) and maintain 70–80°F for best results. Track your progress with a seed-starting journal!
Can I grow brugmansia from store-bought seed pods?
Yes, but with caveats. Seeds from grocery-store pods (like those labeled "angel’s trumpet") may be hybridized or treated to prevent germination. For reliable results, source seeds from specialty nurseries or online sellers. If you’re experimenting, try scarifying (lightly nicking) the seeds to break dormancy.
What if my brugmansia seeds mold or rot?
Overwatering or poor drainage is usually the culprit. Fix it fast:
- Use sterilized seed-starting mix (avoid garden soil).
- Plant seeds in well-draining pots with drainage holes.
- Water from below (place pots in trays with ½" of water) to prevent fungal issues.
- If mold appears, discard the batch and restart with fresh seeds.
Should I start brugmansia seeds indoors or outdoors?
Always indoors first! Brugmansia seeds thrive in controlled warmth (70–80°F) and humidity. Transplant seedlings only after they’ve developed 2–3 true leaves and outdoor temps stay above 60°F at night. Harden them off for 7–10 days before moving to the garden. Outdoor sowing? Skip it—these tropical plants won’t survive cold soil.
Wrapping up and next steps
Brugmansia seed pods may seem intimidating, but with the right techniques—like proper stratification, moisture control, and patience—you can unlock fast, reliable sprouts for your garden. Whether you're a seasoned gardener or a curious beginner, these secrets will help you grow stunning angel’s trumpets with confidence. 🌱
Ready to dive in? Gather your supplies, follow the steps, and start your brugmansia journey today! Your dream garden is just a seed pod away—happy planting! 🌿