
Lawn
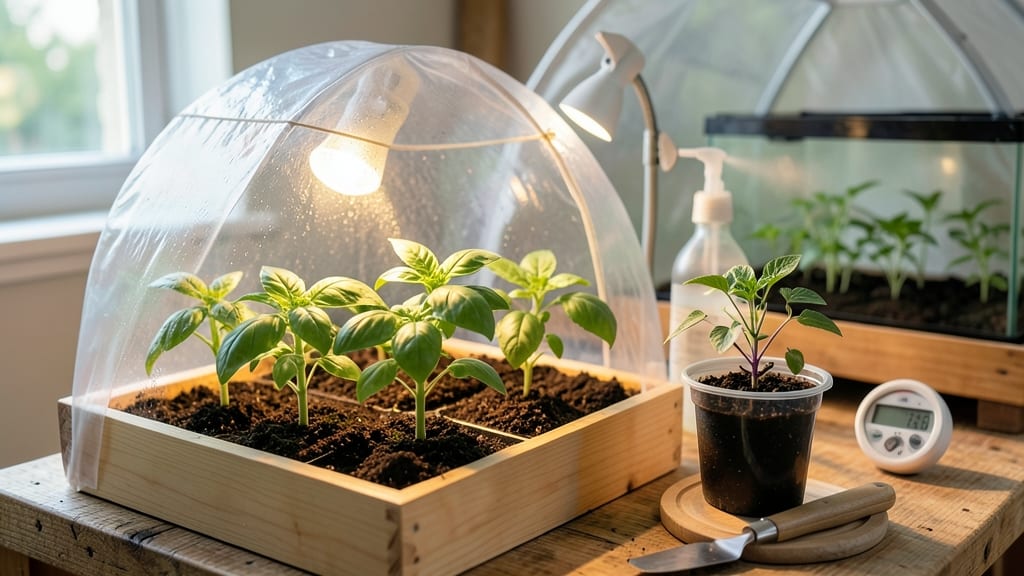
A DIY seed greenhouse lets you start seeds months earlier than your last frost—no cold stratification needed. 🌱 I built mine from a repurposed plastic storage bin, a piece of plywood, and some zip ties, and now I’m growing tomatoes, peppers, and herbs year-round without fuss.
The beauty of this setup is its flexibility: you can use anything from a clear plastic tote to an old window frame, depending on space and budget. A simple vent or cracked lid keeps seedlings from overheating, while the plastic traps warmth to speed up germination—even in cool springs.
My first batch of basil sprouted in just five days instead of the usual two weeks.
You’ll end up with stocky, dark-green seedlings that outpace anything from a nursery. The structure also doubles as a hardening-off zone, so you can skip the gradual outdoor transition and plant directly into the garden. No more waiting for warm soil or praying for good weather.
Works for balconies, sunrooms, or even a sunny windowsill. Here’s how to build one that actually works—no green thumb required. Let’s get growing!
📚 In This Guide
- What you need
- Instructions
- Tips and common mistakes
- Wrapping up and next steps
What you need
- ● Clear plastic sheeting or greenhouse plastic: 4–6 mil thickness (4’ x 8’ sheet for a basic frame, adjust based on size).
- ● Wooden frame or PVC pipes: Option 1: 1x2 or 2x4 lumber (8–12 ft total, cut into 2–4 ft sections for corners/supports).
- ● Option 2: ½”–¾” PVC pipes + connectors (4–6 pieces, 4–6 ft long each).
- ● Ziploc bags or seedling trays: 1–2 packs (for starting seeds).
- ○ Grow lights (optional but helpful): LED full-spectrum bulb (12–15W) or a small clip-on light.
- ● Thermometer/hygrometer: 1 (to monitor temperature/humidity).
- ● Drill + screws/nails: For assembling the frame (or use zip ties for PVC).
- ● Spray bottle: For gentle watering.
- ● Hacksaw or PVC cutter: For clean cuts on pipes.
- ● Staple gun: To secure plastic to the frame.
- ● Ventilation kit: Small fan or mesh panels for airflow.
- ● Heat mat (for cold climates): 1–2 ft x 4 ft mat (90–120W).
- ● Reflective insulation: Bubble wrap or aluminum foil (to boost warmth).
Step-by-Step instructions for building a DIY seed greenhouse
Here’s how to create a simple, effective greenhouse that keeps seeds warm and moist year-round—no fancy tools needed.
🪴 Step 1: Choose and Prepare Your Base Structure
Start with a sturdy, clear plastic storage bin or a repurposed glass aquarium—both work perfectly. I like using a 12-inch tall, 18-inch wide bin because it gives seeds plenty of room to grow without overheating. If using a bin, remove any lids or covers to create an open-top design. For extra stability, place a 1-inch layer of pebbles or gravel at the bottom to improve drainage and prevent rot.
Line the bottom with a plastic nursery tray or a piece of landscape fabric to catch any excess water. This keeps your workspace clean and prevents soil from spilling out when you water. A small fan on low speed placed near the greenhouse helps circulate air and prevents mold—just don’t let it blow directly on the seeds.
💧 Step 2: Set Up Moisture and Heat Control
Place the greenhouse in a sunny spot where it gets at least 6 hours of indirect light daily. If your space is dim, a small LED grow light on a timer (set for 12-14 hours) works wonders. I use a heat mat underneath the bin to maintain a 75-85°F soil temperature—this is critical for fast germination. Most heat mats plug into a standard outlet and have built-in thermostats to keep things safe.
Add a spray bottle filled with lukewarm water to mist the soil lightly after planting. Overwatering is the biggest mistake here—wait until the top inch of soil feels dry before adding more moisture. A small humidity tray (like a shallow dish with pebbles and water) under the bin adds extra moisture without drowning the seeds.
☀️ Step 3: Plant and Monitor for Germination
Fill the bin with sterile seed-starting mix (never garden soil—it’s too dense and can harbor diseases). Press it down lightly so it’s firm but not packed. Plant seeds ¼ inch deep, following the packet instructions, and cover lightly with more mix. Label each section with the seed type and planting date—trust me, you’ll forget after a week of identical sprouts.
Cover the top with clear plastic wrap or a humidity dome to trap warmth and moisture. Check daily for condensation on the plastic—this means the humidity is just right. Once you see 50% of seeds sprouting, remove the cover immediately to prevent damping-off disease. Strong seedlings will have thick stems and dark green leaves within 7-10 days. If they look leggy or pale, move them closer to the light.
⏰ Step 4: Maintain and Transition Seedlings
After 2-3 weeks, when seedlings have 2-3 true leaves, it’s time to thin or transplant. Use a small spoon to gently lift seedlings and replant them in individual pots if needed. Water at the base to avoid disturbing the roots—this is when most seedlings struggle, so be gentle. A small hand trowel helps dig tiny holes without damaging delicate stems.
Keep the greenhouse in place until seedlings are 4-6 weeks old and have 4-6 true leaves. At this stage, they’re ready to move outdoors or into larger containers. Harden them off by placing the greenhouse outside for 1-2 hours daily, gradually increasing exposure. You’ll know they’re ready when they don’t wilt after a full day outside.
Tips & tricks for perfect DIY seed greenhouse setups
Building a greenhouse doesn't have to be complicated—these simple tricks will help you avoid common pitfalls and get the best results from your seed-starting efforts.
Base Structure Stability: For Step 1, if you're using a plastic bin, place it on a flat, stable surface to prevent tipping—especially if you're adding a heat mat underneath. I've seen bins wobble when placed on uneven surfaces, which can disrupt the delicate balance of warmth and moisture your seeds need. A small rubber mat under the bin adds extra grip and prevents scratches to your countertop.
Lighting Optimization: In Step 2, if you're using a grow light, position it just a few inches above the seedlings as they grow. I start with the light about 6 inches above the soil and raise it gradually as the seedlings grow taller. This prevents leggy growth from stretching toward the light. The 12-14 hour timer setting is perfect—just make sure the light turns off automatically to mimic natural daylight cycles.
Germination Monitoring: During Step 3, when you're checking for that 50% sprouting rate, use a small mirror or flashlight to peer underneath the plastic wrap without removing it completely. This helps you monitor progress without disturbing the humidity levels inside. The condensation check is your best indicator—if you see heavy condensation daily, that's perfect. If it disappears after a day or two, you may need to add a bit more moisture or adjust the humidity dome.
Transplanting Technique: For Step 4's thinning process, I've found that using a butter knife instead of a spoon gives you more control when lifting seedlings. Slide the knife gently under the seedling at a slight angle to avoid damaging roots. When replanting, make sure the soil level is the same as it was in the greenhouse—burying too deep can cause stems to rot, while planting too shallow can expose roots to drying out.
Pro Tips for Diy Seed Greenhouse
- Building a greenhouse doesn't have to be complicated—these simple tricks will help you avoid common pitfalls and get the best results from your seed-starting efforts.
- Base Structure Stability: For Step 1, if you're using a plastic bin, place it on a flat, stable surface to prevent tipping—especially if you're adding a heat mat underneath.
- Lighting Optimization: In Step 2, if you're using a grow light, position it just a few inches above the seedlings as they grow.
Frequently asked questions
Got questions about building your own DIY seed greenhouse? You’re not alone! Here are some of the most common concerns—and straightforward answers—to help you get started with confidence.
What’s the cheapest way to build a DIY seed greenhouse?
Use repurposed materials like plastic storage bins, old windows, or even a clear plastic storage tote with a lid. Pair it with a heat mat ($10–$20) and a small LED grow light ($25–$40) for minimal cost. Thrift stores and recycling centers are goldmines for free or low-cost supplies!
How long does it take for seeds to germinate in a greenhouse?
Germination time varies by seed type, but a DIY greenhouse speeds things up! Most fast-germinating seeds (like lettuce or radishes) sprout in 5–10 days, while slower seeds (tomatoes, peppers) may take 1–3 weeks. Keep humidity high and temps steady (70–85°F) for best results.
Can I use a DIY greenhouse in winter without extra heat?
Yes, but with adjustments! Place it in the sunniest spot (south-facing windows work well) and insulate with bubble wrap or a thick towel. For extra warmth, nestle it near a sunny wall or use a low-wattage heat source (like a heated seed mat) sparingly. Avoid direct heat sources like space heaters.
What’s the biggest mistake beginners make with DIY seed greenhouses?
Overcrowding seeds or neglecting airflow! Too many seeds compete for light and moisture, while poor ventilation leads to mold. Space seeds 1–2 inches apart and crack the lid daily for fresh air. A small fan (or even waving a piece of cardboard) helps circulation.
What if my seeds aren’t germinating? Troubleshooting tips?
Check these first:
- Moisture: Keep soil damp (not soggy)—mist lightly if needed.
- Light: Seeds need 12–16 hours of light daily; supplement with a grow light if natural light is weak.
- Temperature: Most seeds need warmth (70–85°F); use a heat mat if your space is chilly.
- Depth: Plant seeds at the correct depth (check seed packet guidelines).
Wrapping up and next steps
Building your own DIY seed greenhouse is a game-changer for year-round gardening!
With just a few materials and a little creativity, you can create the perfect environment for seeds to thrive—no cold stratification needed. 🌱 Whether you're a seasoned gardener or just starting out, this project is both rewarding and practical.
Now that you’re armed with the knowledge to get started, take the next step and gather your supplies. Sketch your design, assemble your greenhouse, and watch your seeds sprout into healthy plants. Happy growing! 🌿