
Lawn
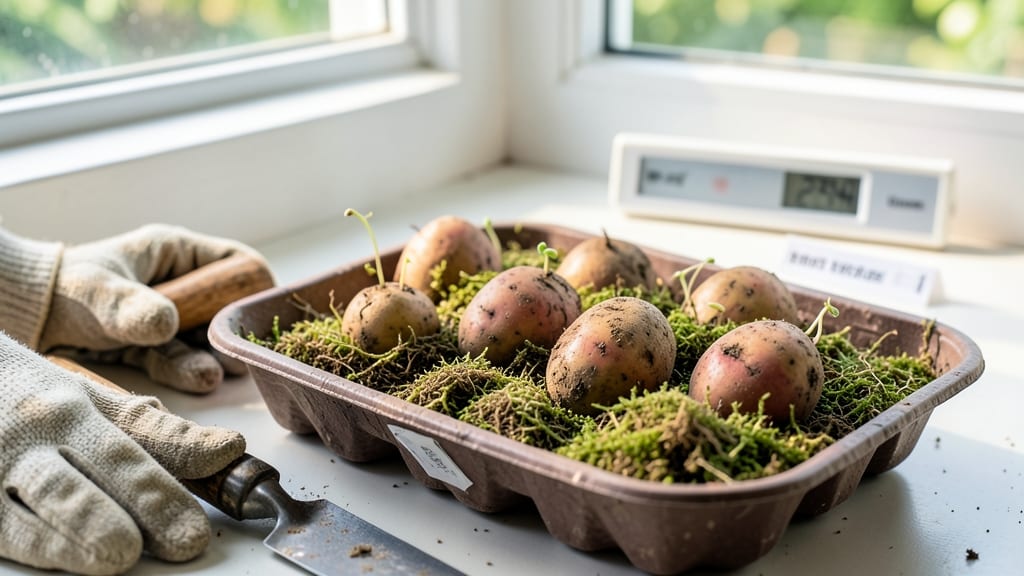
Pre-sprouting seed potatoes gives you a 4-week head start on the growing season. ✨ I’ve seen chubby little sprouts called "chits" emerge from my seed potatoes by early March—just by following a few simple steps that turn a basic pantry into a mini greenhouse.
The secret is all about light and warmth. You’ll need a cool, dark spot for the first two weeks to encourage root formation, then bright indirect light to grow those sturdy green chits.
My favorite method uses an egg carton and a sunny windowsill, but even a cardboard box with a light source works. Most seed potatoes will sprout within 2-3 weeks if stored at 45-50°F with good airflow.
By planting time, you’ll have strong, viable sprouts ready to hit the ground running. These chits establish faster, resist frost better, and produce harvests weeks ahead of unsprouted potatoes. The key is patience—wait until the chits are about 1-2 inches long before planting, and you’ll avoid the shock of transplanting.
This method works for any climate, whether you’re in a short-season zone or just eager to get an earlier harvest. Once you try it, you’ll never go back to planting unsprouted seed potatoes again!
📚 In This Guide
- What you need
- Instructions
- Tips and common mistakes
- Wrapping up and next steps
What you need
- ● Seed potatoes: 5–10 lbs (2.3–4.5 kg) of certified disease-free, organic seed potatoes (look for varieties like Yukon Gold, Red Pontiac, or Kennebec). Pro tip: Choose medium-sized tubers (golf-ball to baseball size) for best results!
- ● Growing containers: 1–2 10-gallon grow bags (or 5–10 gallon buckets with drainage holes), or
- ● A large cardboard box (12" deep, lined with newspaper or burlap).
- ● Growing medium: 5–10 gallons of well-draining potting mix (avoid garden soil—it compacts and holds too much moisture).
- ● Drainage: 1–2 inches of gravel, perlite, or coarse sand for the bottom of containers.
- ● Watering can or spray bottle (gentle watering prevents rot).
- ● Sharp knife or pruning shears (for cutting seed potatoes, if needed).
- ● Heating mat (to maintain 60–70°F for faster sprouting).
- ● Grow lights (if sprouting indoors with limited sunlight).
- ● Plant labels (to track varieties).
- ● Compost or worm castings (for nutrient boost).
- ● Humidity dome or plastic wrap (to retain moisture during early stages).
How to pre-sprout seed potatoes for faster, stronger growth
Here's the simple method I use every year to get a head start on the growing season.
🌱 Step 1: Select and Prepare Your Seed Potatoes
Choose certified seed potatoes—not grocery store potatoes—because they're disease-free and genetically bred for growing. Look for medium-sized tubers with at least 2-3 eyes (the little dimples where sprouts emerge). Smaller potatoes often have fewer eyes, while giant ones can produce weak, uneven growth.
Place your seed potatoes in a well-lit area like a sunny windowsill or basement shelf. Keep them in a paper bag or cardboard box to prevent rot while allowing airflow. This mimics natural conditions where potatoes would sprout before planting. I like to label each variety so I don't mix them up later.
☀️ Step 2: Provide Light and Warmth for Sprouting
After 2-3 weeks, you'll see tiny green shoots (called "chits") emerge from the eyes. These chits are your signal that sprouting is working. Once they reach ½ to 1 inch long, your potatoes are ready for planting. If your space is dark, move them to a bright, indirect light—direct sun can make the sprouts grow too long and leggy.
Keep the temperature between 45-55°F during the day and 35-45°F at night. A cool basement or garage works perfectly. Avoid heat sources like radiators, which can cause the potatoes to rot before sprouting. Watch for any tubers that start to shrivel or smell—remove those immediately to prevent spoilage.
🪴 Step 3: Plant Sprouted Potatoes for Maximum Yield
When your chits are 1-2 inches long, it's time to plant. Dig trenches 4-6 inches deep and space them 12-15 inches apart in rows that are 3 feet apart. Place each potato with the chits facing upward—this ensures the sprouts grow toward the soil surface instead of curling underground. Cover lightly with soil, leaving the top ½ inch exposed to prevent rot.
Water gently but thoroughly after planting to settle the soil around the tubers. Mulch with 2-3 inches of straw or grass clippings to retain moisture and regulate temperature. In 2-3 weeks, you'll see the chits break through the soil—this is when you know your potatoes are off to a strong start.
⏰ Step 4: Monitor and Maintain Through Early Growth
Keep the soil consistently moist but not soggy—water when the top 2 inches feel dry. Overwatering can cause rot, while underwatering stresses the plants. As the stems grow taller, hill the soil around the base every 2-3 weeks to encourage more tuber formation. This means piling soil up to cover the lower stems, leaving only the top 6 inches exposed.
Watch for pests like Colorado potato beetles—they love young potato plants. If you spot eggs (tiny orange ovals on leaves), remove them by hand or treat with neem oil as a preventative. By the time flowers appear (6-8 weeks after planting), your potatoes will be well-established and ready for a bountiful harvest.
Tips & tricks for pre-sprouting seed potatoes
Real talk: Pre-sprouting seed potatoes is where the magic happens for a bumper crop. Here's what I've learned after years of trial and error to make sure your chits grow strong and healthy.
Light Matters: The 2-3 weeks of sprouting in Step 2 are all about getting those chits just right. Place your potatoes in bright, indirect light—think of it like a gentle sunbath. Direct sunlight can cause the chits to grow too long and leggy, which makes them more prone to breakage when you plant. A north-facing window or under a grow light works best. If your space is dark, move them to a brighter spot as soon as you see the first signs of sprouting.
Temperature Control: Keeping your potatoes in that 45-55°F range during the day (and 35-45°F at night) is crucial, but don't stress if your home doesn't have perfect thermostat control. A cool basement or garage is ideal, but even a well-ventilated closet can work. Just avoid heat sources like radiators or sunny windowsills that can push temperatures too high. If your potatoes start to shrivel or smell, they're getting too warm—remove them immediately to prevent rot.
Chit Length Check: When your chits reach 1-2 inches long in Step 3, that's your green light to plant. But here's the thing: don't wait until they're longer than 2 inches. Longer chits can break easily when you handle them, and they might not establish as well in the soil. I like to check them every few days once they start sprouting—this way, you'll catch them at the perfect planting size without overgrowing.
Planting Position: This one's easy to overlook, but planting your potatoes with the chits facing upward makes all the difference. It might seem counterintuitive, but this ensures the sprouts grow toward the surface instead of curling underground. When you plant, make a small indentation in the soil and place the potato so the chits are pointing up—it takes about 10 seconds per potato, but it's worth it for stronger plants.
Pro Tips for Pre Sprouting Seed Potatoes
- Real talk: Pre-sprouting seed potatoes is where the magic happens for a bumper crop. Here's what I've learned after y...
- Light Matters: The 2-3 weeks of sprouting in Step 2 are all about getting those chits just right. Place your potatoes...
- Temperature Control: Keeping your potatoes in that 45-55°F range during the day (and 35-45°F at night) is crucial, bu...
Frequently asked questions
Got questions about pre-sprouting seed potatoes? You’re not alone—this process can feel tricky at first! Below, we’ve answered the most common queries to help you grow chubby, ready-to-plant potatoes in just four weeks.
What’s the best time to start pre-sprouting seed potatoes?
Start sprouting seed potatoes 4–6 weeks before your last frost date (or 6–8 weeks in cooler climates). This gives sprouts (called "chits") time to grow but keeps them from getting too leggy or green before planting. Aim for 1-inch-long chits—perfect for sturdy starts!
Can I pre-sprout potatoes in direct sunlight or do they need darkness?
Potatoes need darkness to sprout evenly—exposure to light turns them green (toxic!) and stunts growth. Store them in a cool, dark place (like a pantry or basement) with good airflow. Once chits reach ½-inch, move them to indirect light for 1–2 days before planting to harden them off.
What if my sprouts turn green or look weak?
Green sprouts mean too much light—move them to a darker spot immediately. Weak or shriveled sprouts could signal rotting or low humidity. Check for soft spots, trim moldy sprouts, and ensure airflow. If sprouts are too leggy, bury them in a pot of soil up to the base to encourage sturdier growth.
Can I use store-bought potatoes for sprouting, or do I need special seed potatoes?
Store-bought potatoes won’t sprout reliably—they’re treated to prevent sprouting! Use certified seed potatoes (available at garden centers or online). They’re disease-free and bred for sprouting. Pro tip: Cut larger seed potatoes into chunks with 2–3 eyes each, let them heal for 1–2 days, then sprout!
How do I store pre-sprouted potatoes until planting?
Keep sprouted potatoes in a cool (40–50°F), dark, humid spot (like a fridge crisper drawer with a damp towel). Avoid plastic bags—they trap moisture and cause rot. Plant them as soon as soil is workable (around 40°F) to prevent stress. If chits get too long, trim them to 1 inch before planting.
Wrapping up and next steps
Pre-sprouting seed potatoes is a game-changer for gardeners eager to jumpstart their harvest—no more waiting for chits to appear in the soil! 🌱 With just a few simple steps, you’ll have plump, ready-to-plant tubers in just four weeks, giving your garden a head start.
Whether you’re a beginner or a seasoned grower, this method saves time, boosts yields, and adds excitement to your planting season.
Now that you’re armed with the know-how, roll up your sleeves and give it a try—your future potato patch will thank you! 🥔✨ Next up: Grab those seed potatoes, set up your sprouting station, and watch those chits pop like magic. Happy growing!