
Lawn
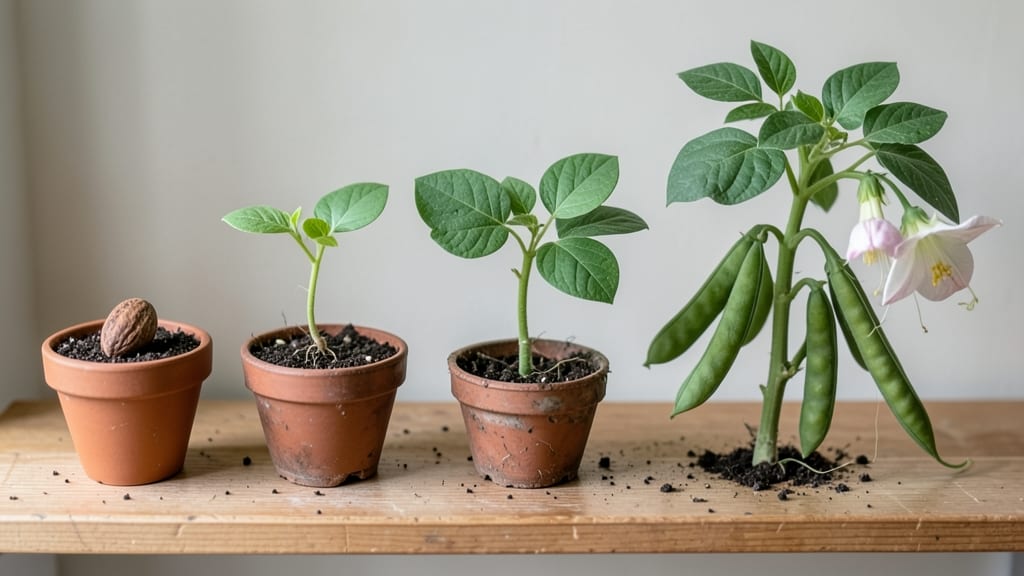
The moment a seed sprouts is when gardening magic really begins. 🌱 Watching a seed grow through its stages—from that first tiny root to a full plant—is like witnessing nature’s most precise performance.
Every phase has its own needs, and knowing them means you can help your plants thrive from day one. First comes germination, where the seed drinks up water and cracks open, sending out a tiny root called the radicle.
This stage is all about moisture and warmth—keep soil damp but not soggy, and within 5-14 days, you’ll see the first green shoot pushing through. After that, the seedling stage kicks in, where those delicate leaves unfurl and the plant starts photosynthesizing for real.
Once the plant hits vegetative growth, it’s all about leaves and stems—this is when you’ll see rapid expansion, and proper light becomes critical. Then, if you’re growing flowers or veggies, you’ll move into flowering and reproduction, where energy shifts from growth to blooms and seeds.
Each stage has its own quirks, but with the right care, you’ll guide your plants through them like a pro.
Troubleshooting is part of the process—delays often mean too little warmth or moisture, while stunted growth could signal poor light or overcrowding.
The key is observing and adjusting: check soil moisture daily during germination, ensure seedlings get 6-8 hours of light, and watch for pests early in the vegetative stage. Even experienced gardeners learn something new every season.
This journey isn’t just about growing plants—it’s about patience, curiosity, and the quiet thrill of watching life emerge from something so small. Whether you’re a beginner or a seasoned gardener, understanding these stages will help you nurture stronger, healthier plants. Ready to dive in?
📚 In This Guide
- What you need
- Instructions
- Tips and common mistakes
- Wrapping up and next steps
What you need
- ● Seeds: Choose fast-growing varieties (e.g., radishes, beans, or grass seeds) for easy observation. Quantity: 10–20 seeds per container.
- ● Growing containers: Small pots (4–6 inches deep) for individual seeds, or
- ● A shallow tray (10x20 inches) for lawn/grass seeds.
- ● Potting soil: Lightweight, well-draining mix (e.g., seed-starting blend). Quantity: 1–2 gallons.
- ● Watering can or spray bottle: Gentle spray for moisture control.
- ● Clear plastic wrap or humidity dome: To retain moisture during germination.
- ● Grow lights or sunny windowsill: 6–8 hours of light daily (LED grow lights work great!).
- ● Measuring tape or ruler: Track seed depth (typically 2x the seed’s width).
- ● Notebook & pen: Log daily observations (date, moisture, growth changes).
- ● Seedling heat mat: Speeds up germination for cool-weather seeds.
- ● Magnifying glass: Get a closer look at early root/sprout development.
- ● Camera or phone with macro mode: Document each stage of a seed growing in detail.
- ● Fertilizer (low-dose): Add after the seedling stage (e.g., diluted fish emulsion).
- ● Transplanting tools: Small trowel for moving seedlings outdoors.
Step-by-step guide to identifying seed growth stages
Watch your seeds transform from tiny dots to thriving plants—here's how to recognize each key phase.
🌱 Step 1: Germination - The First Signs of Life
The journey begins when your seed absorbs moisture and swells. You'll notice this as a slight softening of the seed coat within 12-24 hours of planting. This is your first clue that germination has started, even though nothing visible has happened yet.
Within 2-7 days (depending on the plant type), watch for the radicle—the first root—to emerge. It's a tiny white thread pushing through the seed coat. This is nature's way of anchoring the plant before any above-ground growth appears. Keep the soil consistently moist but not soggy during this phase. Overwatering now can suffocate the delicate root.
🌱 Step 2: Seedling Emergence - Breaking Through the Soil
When you see the first true leaves appear, you're looking at a seedling that's 7-14 days old. These initial leaves (called cotyledons) look different from later leaves—they're usually rounder and thicker. This is your plant's first attempt at photosynthesis, though it's not yet fully functional.
At this stage, you'll notice the stem growing taller rapidly. Don't be alarmed if it looks weak—this is normal. The key is to provide bright, indirect light immediately. Place your seedling within 2-4 inches of a grow light if natural light isn't sufficient. You'll see the difference in just a few days as the stem thickens and leaves darken.
🌿 Step 3: Vegetative Growth - Building Strength
When the seedling develops its second set of leaves (the true leaves), you've entered the vegetative stage. These leaves will look more like the mature plant's foliage—thinner, more defined edges, and often with different shapes. This typically occurs when the plant is 2-4 weeks old, though fast-growing plants may reach this stage sooner.
This is when you'll notice rapid growth above ground. The stem will thicken noticeably, and you'll see new leaves unfurling every 2-3 days. Pay attention to leaf arrangement—healthy plants have leaves spaced evenly along the stem. If leaves cluster at the top, your plant needs more light to encourage balanced growth.
☀️ Step 4: Maturation - Ready for Flowering or Harvest
The final stage varies by plant type. For vegetables, you'll see flower buds forming when the plant is 4-8 weeks old, depending on the variety. These buds appear as small bumps in the leaf axils. For herbs, you'll notice the plant reaching its full height and developing a bushier appearance.
At this point, your plant should have a strong root system and multiple sets of mature leaves. You'll see flowers opening for fruiting plants, or you can begin harvesting leaves for herbs. This is when you'll notice the plant's true characteristics—whether it's the tall stems of basil, the feathery leaves of parsley, or the spiky growth of rosemary.
⏰ Step 5: Maintenance - Keeping Plants Thriving
Once your plant reaches maturity, focus shifts to maintenance. You'll notice new growth appearing at the tips of branches, and older leaves may start yellowing at the edges—this is normal aging. Regularly check the bottom leaves first, as they're the earliest to show signs of stress.
During this stage, you'll see the plant's natural growth habits emerge. Some plants will spread outward, others will grow taller, and some will develop specific leaf patterns. Pay attention to these characteristics—they tell you when to prune, fertilize, or harvest. For example, when you see flower buds forming on tomato plants, it's time to prune suckers to encourage fruit production.
Tips & tricks for perfect seed growth observation
Here's what nobody tells you about watching seeds grow—these insights will help you spot each phase like a pro.
Germination Timing: That 12-24 hour window when your seed just softens is the most critical moment. I've learned to check seeds every 6 hours during this period—especially if you're growing heat-loving plants like peppers or tomatoes. The moment you see that first tiny crack in the seed coat, mark your calendar because the radicle will appear within hours.
Light Placement Precision: When your seedlings reach that 7-14 day mark and you're placing them near grow lights, don't just eyeball it. Use a ruler to position them exactly 2-4 inches away—closer than 2 inches can scorch tender leaves, while more than 4 inches might cause leggy growth. I keep a small measuring tape on my growing shelf for this exact purpose.
Leaf Shape Clues: The difference between cotyledons (first leaves) and true leaves is more important than you think. Cotyledons are basically the seed's baby food packet—they store nutrients until the plant can photosynthesize. True leaves, which appear around 2-4 weeks, are where the real magic happens. I always snap a photo of my first true leaves to track progress later.
Maturation Tell-Tales: Those flower buds at 4-8 weeks? They're actually a great way to predict harvest times. For tomatoes, buds in the leaf axils mean fruit will appear in about 2 weeks. For herbs like basil, a bushier appearance means it's ready for your kitchen. I keep a small notebook to record when I see these signs—it's become my plant's growth diary.
Pro Tips for Stages Of A Seed Growing
- Here's what nobody tells you about watching seeds grow—these insights will help you spot each phase like a pro.
- Germination Timing: That 12-24 hour window when your seed just softens is the most critical moment.
- Light Placement Precision: When your seedlings reach that 7-14 day mark and you're placing them near grow lights, don't just eyeball it.
Frequently asked questions
Got questions about seed growth? You’re not alone! Here are answers to the most common queries about the stages of a seed growing, from germination to maturity.
How long does it take for a seed to sprout?
Germination time varies by seed type. Fast growers like radishes sprout in 3–7 days, while slower seeds (e.g., beans, tomatoes) may take 7–21 days. Factors like soil temperature, moisture, and seed health also play a role. Check the seed packet for specifics!
Can seeds grow in cold weather?
Most seeds need warm soil (60–85°F) to germinate, but some—like peas or spinach—tolerate cooler temps (40–50°F). If planting in cold climates, use row covers or cold frames to protect young sprouts. Avoid planting when frost is forecasted.
What if my seeds aren’t sprouting?
Try these fixes:
- Check moisture: Soil should stay consistently damp (not soggy). Use a spray bottle for delicate seeds.
- Test seed viability: Soak seeds in water—if they sink, they’re likely good. Old or stored improperly seeds may fail.
- Adjust light/temp: Some seeds need darkness (e.g., tomatoes) or warmth (e.g., peppers) to germinate.
Do all seeds go through the same growth stages?
No! While most seeds follow germination → seedling → vegetative → flowering → maturity, timing and appearance vary. For example:
- Grass seeds focus on root/leaf growth first.
- Flowering plants prioritize bud development.
- Vegetables (like tomatoes) develop fruit after flowering.
Can I grow seeds indoors without sunlight?
Yes! Use a grow light (LED or fluorescent) 12–16 hours/day to mimic sunlight. Place seeds in a warm, humid environment (like a propagator or sealed container with plastic wrap). Once seedlings sprout, move them near a sunny window or under lights until transplanting.
Wrapping up and next steps
Watching a seed transform into a thriving plant is nothing short of magical! 🌱 From imbibition to maturity, each stage plays a crucial role in shaping your lawn or garden. Remember, patience and care are key—whether you're nurturing a single seedling or dreaming of a lush green space.
Ready to take the next step? Grab your gardening tools and start planting! Whether you’re a beginner or a seasoned green thumb, every seed you sow today could bloom into something beautiful tomorrow. Happy growing! 🌿