
Shrubs
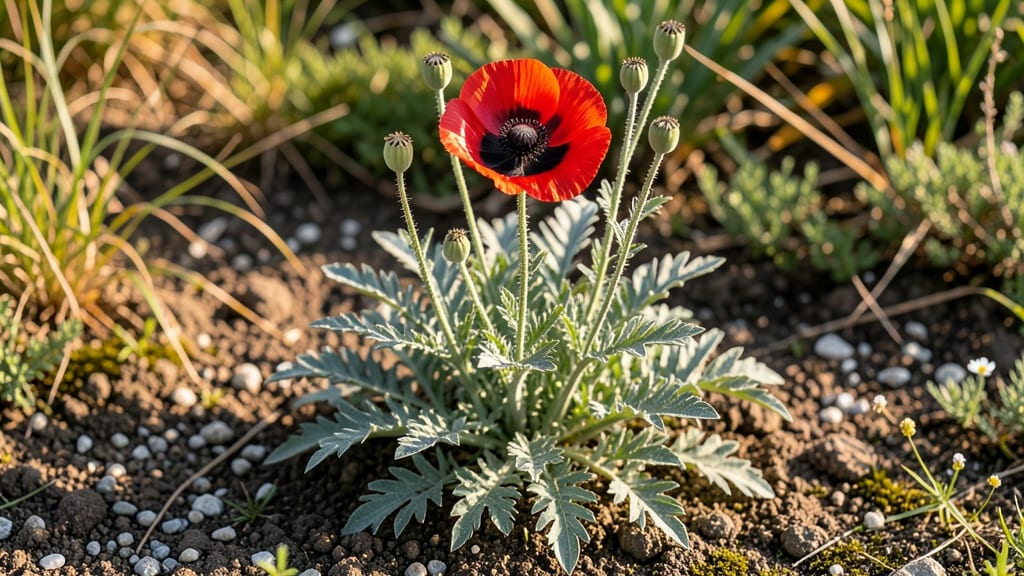
Growing red breadseed poppies from tiny seeds yields shockingly bold blooms in just 90 days. 🌸 I remember my first attempt—scattered seeds in spring, then waiting for those delicate papery petals to emerge like magic.
These poppies thrive where other flowers struggle, making them perfect for cottage gardens, wildflower meadows, or even containers.
The secret lies in their love for poor soil and full sun—they’ll pop up even in cracks of pavement if given enough light. Plant seeds directly in the ground in early spring or fall, barely covering them since they need sunlight to germinate.
Water lightly until established, then let nature take over—these tough little seeds handle drought once rooted.
By summer, you’ll be rewarded with vibrant red blooms that attract pollinators and self-seed prolifically. The more you grow, the more they spread, creating a natural tapestry of color.
Just be ready for their ephemeral beauty—they bloom, set seed, and fade within weeks, but their legacy lives on in next year’s volunteers.
Perfect for beginners or seasoned gardeners looking to add low-maintenance drama to their space. Whether you’re restoring a wildflower meadow or brightening a sunny corner, these poppies deliver effortless charm. Let’s get those seeds in the ground!
📚 In This Guide
- What you need
- Instructions
- Tips and common mistakes
- Wrapping up and next steps
What you need
- ● Red breadseed poppy seeds – 1 packet (approx. 1,000 seeds) (choose a reputable supplier for high germination rates).
- ● Well-draining potting mix – 2–3 gallons (avoid heavy clay soil; mix with perlite or sand for aeration).
- ● Seed-starting trays or small pots – 50–100 cell trays (2–3 inches deep) or 4-inch pots (if direct-sowing).
- ● Seed-starting soil or compost – 1–2 cups (sterilized to prevent mold).
- ● Grow lights or sunny windowsill – 6–8 hours of light daily (poppies need brightness to germinate!).
- ● Misting bottle or watering can – with a fine rose nozzle (gentle watering prevents seed displacement).
- ○ Fertilizer (optional but helpful) – Balanced 10-10-10 or low-nitrogen formula (dilute to half-strength for seedlings).
- ● Gloves – gardening gloves (to protect hands from soil and prickly stems).
- ● Trowel or small shovel – for transplanting (if hardening off seedlings).
- ○ Spray bottle (for humidity) – optional but recommended (helps maintain moisture in dry climates).
- ● Garden stakes or markers – to label seedlings (red poppies can cross-pollinate with other colors!).
- ● Sunny garden spot or raised bed – full sun (6+ hours/day) (poppies thrive in warm, open areas).
- ● Patience! 😉 – Germination takes 7–14 days (don’t overwater or disturb seeds).
- ○ 💡 Cold stratification (optional): Chill seeds in the fridge for 1–2 weeks before planting to mimic winter conditions and boost germination.
- ● 🌡️ Temperature control: Keep soil 60–75°F (15–24°C) for optimal growth—poppies hate soggy roots!
- ● 🎯 Thin seedlings: Space mature plants 12–18 inches apart to prevent overcrowding (they’ll reward you with bold, papery blooms!).
Step-by-step instructions for growing red breadseed poppies
Here’s my foolproof method for coaxing those striking crimson blooms from tiny, finicky seeds—no black magic required.
🌱 Step 1: Start Seeds Indoors at the Right Time
Breadseed poppies need a long growing season, so begin seeds 8-10 weeks before your last frost date—they’ll bolt (flower) fast once warm weather hits. I use biodegradable peat pots (3-inch deep) filled with sterile seed-starting mix (never garden soil—it’s too dense). Moisten the mix until it’s damp like a wrung-out sponge, then press it down lightly to remove air pockets.
Sow seeds ¼ inch deep—they’re tiny, so I use a toothpick to make a shallow furrow. Place 2-3 seeds per pot (they germinate unpredictably). Cover with a fine layer of mix, then mist gently with water. Poppies hate soggy soil, so avoid soaking. Label each pot—those first sprouts look identical until they’re weeks old.
💧 Step 2: Provide Warmth and Light for Germination
Poppy seeds germinate best at 65-75°F, so I use a seedling heat mat or place pots on top of the fridge. Keep the soil consistently moist (not wet) by bottom-watering—place pots in a tray of ½ inch of water for 10 minutes daily. A clear plastic dome or plastic wrap helps retain humidity, but remove it as soon as sprouts appear (usually 7-14 days) to prevent damping-off.
Once seedlings emerge, move them under grow lights (14-16 hours daily). Poppies stretch toward light like teenagers reaching for candy—if they grow leggy (thin, pale stems), your light is too far away. Keep lights 2-3 inches above seedlings and raise them weekly as plants grow. You’ll know you’ve got it right when seedlings have bold green leaves and compact stems.
☀️ Step 3: Harden Off and Transplant Outdoors
Two weeks before your last frost, start hardening off seedlings by placing them outside in a sheltered spot for 1-2 hours the first day. Gradually increase time over 7-10 days, ending with a full day outdoors. Poppies are frost-tolerant but prefer to establish roots before cold snaps. Choose a sunny spot with well-draining soil—they’ll sulk in soggy conditions.
Transplant seedlings 6-8 inches apart in rows 12-18 inches apart. Dig holes just deep enough to bury the root ball, then water deeply to settle soil. Poppies resent root disturbance, so handle seedlings by their leaves (not stems) to avoid snapping. After transplanting, water at the base once daily for a week to help roots establish.
🌿 Step 4: Maintain Through Bloom Season
Poppies thrive with minimal care once established. Water deeply 1-2 times weekly, letting the soil dry between waterings—overwatering causes rot. Fertilize lightly with balanced 10-10-10 at planting, then again when flowers appear. Deadhead spent blooms to encourage more flowers (though they self-seed readily).
Watch for aphids on new growth—spray with neem oil if you spot sticky residue. Poppies are annuals, so they’ll fade after frost. But here’s the magic: Save seeds from dried seed pods (they’ll rattle when ready) for next year’s garden. Those tiny seeds hold the promise of bold, papery blooms that dance in the breeze.
Tips & tricks for perfect red breadseed poppy cultivation
Took me years of trial-and-error to master these subtle tricks—now you can skip the heartache and grow poppies that rival a meadow.
Timing Secret: The 8-10 week indoor start window is non-negotiable for most climates. Use your average last frost date as your anchor, then count backward. For example, if your last frost is May 15th, start seeds by March 1st. Pro tip: Mark your calendar when you sow seeds so you remember when to transplant. I've seen beginners miss this window completely and end up with sad, leggy plants that never bloom.
Seedling Heat Mat Hack: When maintaining that 65-75°F germination range, place your seedling heat mat on a timer for 12 hours on/12 hours off. This mimics natural day-night temperature fluctuations and prevents seedlings from becoming over-soft or etiolated. If you don't have a heat mat, try placing pots on top of your refrigerator—it stays consistently cool and provides stable temperatures. The key is consistency: poppy seeds are finicky about temperature swings.
Lighting Technique: For the 14-16 hours of daily light, position your grow lights so they're just 2-3 inches above the seedlings' tallest leaves. This prevents that classic "poppy stretch" where seedlings grow tall and spindly. I like to use a simple clip-on LED grow light that's energy-efficient and adjustable. Watch for that perfect balance: leaves should be dark green and compact, not pale and stretched. If you notice seedlings reaching toward the light, raise the lights immediately or add a few hours of light.
Transplanting Wisdom: When transplanting your 6-8 week old seedlings, water them thoroughly the day before moving them outside. This helps prevent transplant shock. After planting, create a small watering well around each plant to direct water straight to the roots. The once-daily watering for that first week is crucial—it gives their delicate roots time to establish without drowning them. I've seen many gardeners overwater during this critical period, leading to root rot.
Pro Tips for Red Breadseed Poppy
- Took me years of trial-and-error to master these subtle tricks—now you can skip the heartache and grow poppies that r...
- Timing Secret: The 8-10 week indoor start window is non-negotiable for most climates. Use your average last frost dat...
- Seedling Heat Mat Hack: When maintaining that 65-75°F germination range, place your seedling heat mat on a timer for ...
Frequently asked questions
When is the best time to plant red breadseed poppy seeds?
Plant seeds outdoors after the last frost when soil temperatures reach at least 50°F (10°C). For cooler climates, start indoors 6–8 weeks before the last frost and transplant seedlings. These fast growers thrive in full sun (6+ hours daily), so avoid early spring planting—seeds need warmth to germinate!
How long does it take for red breadseed poppy to flower?
Expect 60–90 days from seed to bloom, depending on conditions. With ideal sunlight (6+ hours/day) and well-draining soil, you’ll see bright red, papery blooms in early to mid-summer. Pro tip: Deadhead spent flowers to encourage a second flush of blooms!
Can I grow red breadseed poppy in containers?
These poppies thrive in 5–6 inch pots with drainage holes. Use a light, sandy soil mix to prevent rot. Place containers in full sun and water only when the top inch of soil is dry. Just avoid overcrowding—space plants 6–12 inches apart for airflow and growth.
Why aren’t my red breadseed poppy seeds germinating?
Common culprits: cold soil (wait for 50°F+), overwatering (keep soil moist but not soggy), or deep planting (seeds need light—press them ¼ inch deep). Try stratifying seeds (chill for 1–2 weeks) if germination is slow. Patience pays off—they’re slow starters but fast growers!
Are red breadseed poppies annual or perennial?
They’re tender annuals in most climates, dying back after frost. However, in USDA Zones 8–10, they may self-seed prolifically! Save seeds from mature pods (let them dry on the plant) and scatter them in fall for next year’s surprise blooms. Bonus: Their seeds are edible—try them in baking!
Wrapping up and next steps
Growing red breadseed poppies is a rewarding journey—turning tiny seeds into vibrant, drought-resistant blooms in just 90 days! With the right soil, sunlight, and care, you’ll enjoy their bold colors and easy maintenance. Whether you’re a gardener or a beginner, these poppies bring effortless beauty to any space.
Ready to plant your passion? Grab your seeds, mark your calendar, and start sowing! 🌱 For extra inspiration, explore companion plants or creative ways to showcase their striking petals in your garden. Happy growing! 🌸