
Planting
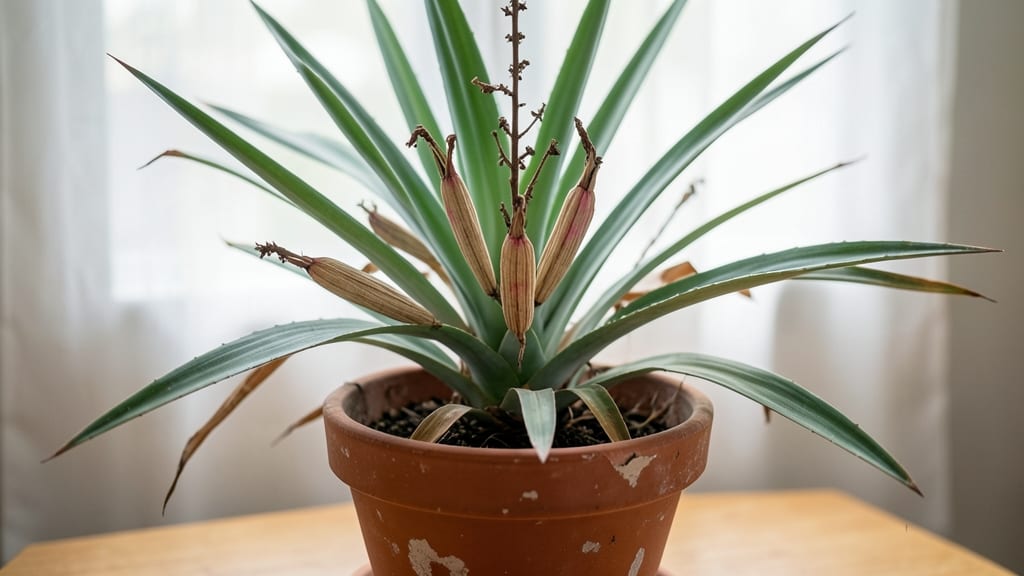
Your red yucca plant seed pods hold the secret to next year's stunning red blooms—if you harvest them right. 🌱 I've cracked the code after years of trial and error, and it turns out the process is simpler than you'd think, with just a few key steps to preserve those seeds properly.
The first step is spotting the perfect pods—look for the ones that've turned from green to a papery brown and feel dry to the touch. Once you've got them, carefully split open the pods to reveal the tiny black seeds inside, which need to dry completely before storage.
This isn't rocket science, but timing matters: harvest too early and the seeds won't germinate; wait too long and they might scatter on their own.
With proper storage in a cool, dry place, these seeds can last for years, ready to sprout into new plants with vibrant red flowers that hummingbirds adore.
The germination process is straightforward too—just plant them shallowly in well-draining soil and keep it barely moist until you see those first green shoots.
This method works for gardeners in zones 7 through 11, where red yucca thrives, and it's perfect for expanding your collection without buying new plants. Here's how to do it without the stress or guesswork.
📚 In This Guide
- What you need
- Instructions
- Tips and common mistakes
- Wrapping up and next steps
What you need
- ● Red yucca seed pods: Mature, dry pods (brown or tan) from healthy plants—aim for at least 10-15 pods for a good seed yield.
- ● Sharp pruning shears or scissors: Clean, sterilized tools to snip pods without damaging the plant.
- ● Paper towels or newspaper: For drying and separating seeds (use 2-3 sheets per batch).
- ● Small bowls or containers: Shallow dishes (e.g., ramekins or egg cartons) for sorting seeds.
- ● Permanent marker: To label containers with the harvest date.
- ● Plastic bags or airtight containers: For long-term seed storage (e.g., ziplock bags with a silica packet or small jars).
- ● Spray bottle with water: To moisten pods if seeds stick stubbornly.
- ● Glove: Protects hands from prickly pods or sap.
- ● Magnifying glass: For inspecting tiny seeds or removing debris.
- ○ Seed viability test kit: (Optional) To check seed freshness before planting.
- ● Notebook: To log pod maturity, location, or germination notes.
How to extract red yucca seeds from pods for successful germination
Here’s my foolproof method for harvesting red yucca seeds—no fuss, no waste, and ready for next season’s blooms.
🌿 Step 1: Identify and Harvest Mature Seed Pods
Wait until pods turn brown and papery—they’ll split open on their own if left too long. Gently twist or pinch the dried pod to release seeds inside. I always harvest in late fall or early winter when pods are fully mature but before they burst open naturally.
If pods are still green, they’re not ready—immature seeds won’t germinate. Look for pods that feel lightweight and brittle when squeezed. Place harvested pods in a paper bag (not plastic) to dry further for 3-5 days in a warm, dry spot like a sunny windowsill.
✂️ Step 2: Open Pods and Remove Seeds
Once pods are completely dry, lay them on a clean surface and squeeze firmly to crack them open. Seeds will spill out easily—no need to force it. I use a small bowl to catch them, which makes cleanup simple. Discard the empty pod husks after extraction.
Separate seeds from any remaining chaff by gently blowing or sifting through them. Discard any black or shriveled seeds—only plump, tan-colored seeds are viable. Store good seeds in a paper envelope labeled with the harvest date in a cool, dry place until ready to plant.
💧 Step 3: Prep Seeds for Planting (Optional but Recommended)
For faster germination, soak seeds in lukewarm water for 12-24 hours before planting. This softens the tough outer coating and mimics natural rainfall. Drain seeds thoroughly after soaking—never plant them wet.
If you’re planting directly outdoors, wait until spring when soil temperatures reach at least 65°F. Red yucca seeds need warmth to sprout, so avoid planting in cool weather. For indoor starts, use a seed-starting tray with well-draining soil and keep it in a sunny window or under a grow light.
🌱 Step 4: Plant Seeds for Next-Year Growth
Scatter seeds ½ inch deep in loose, well-draining soil. Space them 6 inches apart if planting directly in the ground—red yucca grows slowly and needs room to establish. Water lightly after planting to settle the soil, but don’t overwater—excess moisture causes rot.
Keep the soil consistently moist but not soggy until seedlings appear, which can take 2-4 weeks. Once sprouts emerge, reduce watering slightly—red yucca is drought-tolerant once established. Thin seedlings to the strongest 3-4 plants per section to avoid overcrowding.
☀️ Step 5: Nurture Seedlings Through Their First Year
Young red yucca plants need full sun (at least 6+ hours daily) to thrive. If growing in containers, place them in a south-facing spot or under bright grow lights. Avoid moving pots frequently—red yucca dislikes root disturbance.
Fertilize lightly in spring with a balanced, low-nitrogen fertilizer (like 10-10-10) to encourage strong root growth. By their second year, plants will produce sturdy stalks and eventually those signature red yucca blooms—worth the wait!
Tips & tricks for perfect red yucca seed extraction
These simple tricks will help you maximize seed yield and ensure your red yucca blooms next season.
Pod Selection: Look for pods that have turned completely brown and feel brittle when gently squeezed—this is your best indicator of maturity. I've learned the hard way that harvesting too early means seeds won't germinate, while waiting too long means they'll scatter naturally. The perfect window is when pods are dry but haven't split open yet.
Drying Strategy: The 3-5 day drying period in Step 1 is crucial—don't skip it! Place pods in a paper bag (never plastic) to allow moisture to escape while preventing seeds from getting damp again. I've found that a sunny windowsill works best, but avoid direct sunlight which can overheat and damage the seeds.
Seed Viability Check: When separating seeds in Step 2, focus on plump, tan-colored seeds—these are your best bet for germination. Discard any black or shriveled seeds immediately, as they won't sprout. I've had success with a simple kitchen sieve to separate seeds from chaff quickly, which saves time and frustration.
Optional Soaking: If you choose to soak seeds for 12-24 hours before planting (Step 3), use lukewarm water—not hot—to avoid damaging the delicate seed coats. I always drain seeds thoroughly after soaking and let them air dry for 30 minutes before planting to prevent mold.
Pro Tips for Red Yucca Plant Seed Pods
- These simple tricks will help you maximize seed yield and ensure your red yucca blooms next season.
- Pod Selection: Look for pods that have turned completely brown and feel brittle when gently squeezed—this is your best indicator of maturity.
- Drying Strategy: The 3-5 day drying period in Step 1 is crucial—don't skip it!
Frequently asked questions
Got questions about harvesting and using red yucca plant seed pods? You’re in the right place! Here are some of the most common queries—plus clear, actionable answers to keep your gardening game strong.
When is the best time to harvest red yucca seed pods?
Harvest seed pods when they’re fully dry and brown but before they split open—usually in late fall or winter (depending on your climate). If pods crack prematurely, seeds may scatter or lose viability. Pro tip: Check pods weekly in dry weather to catch the perfect moment!
How do I know if the seeds inside are still viable?
Fresh seeds should be plump, firm, and dark brown. Test viability by filling a glass with water, adding seeds, and waiting 15–30 minutes—viable seeds sink (non-viable ones float). Store seeds in a cool, dry place (like a paper envelope) for up to 1–2 years.
Can I grow red yucca from seed pods, or should I propagate cuttings?
Both work! Seeds are slower (6+ months to bloom) but great for variety. Cuttings (from mature stems) root faster and mimic parent plants. For quick results, try cuttings—but seeds add fun surprises! Bonus: Soak cuttings in rooting hormone for 100% success.
What do I do if my seed pods mold or rot before drying?
Mold or rot usually means high humidity or poor airflow. If pods are already affected, discard them immediately—mold can spread to healthy pods. Prevent it: Harvest pods on dry days and store them in a well-ventilated container (like a mesh bag) away from moisture.
Are red yucca seed pods edible, or just for planting?
Nope—these pods are 100% ornamental and non-edible (they contain toxic compounds if ingested). Stick to planting! For culinary uses, try yucca plants’ flower buds (cooked like asparagus), but always research local guidelines first.
Wrapping up and next steps
Extracting red yucca seed pods is a simple yet rewarding way to ensure vibrant blooms next season!
With the right tools and a little patience, you can harvest, dry, and store seeds effortlessly—no green thumb required. 🌱 Whether you’re a seasoned gardener or just starting, these pods hold the promise of future beauty, so grab your gloves and get ready to nurture next year’s garden magic.
Ready to take the next step? Mark your calendar for late summer or early fall to collect pods, then share your progress with fellow plant lovers—your journey could inspire others! 🌸