
Propagation
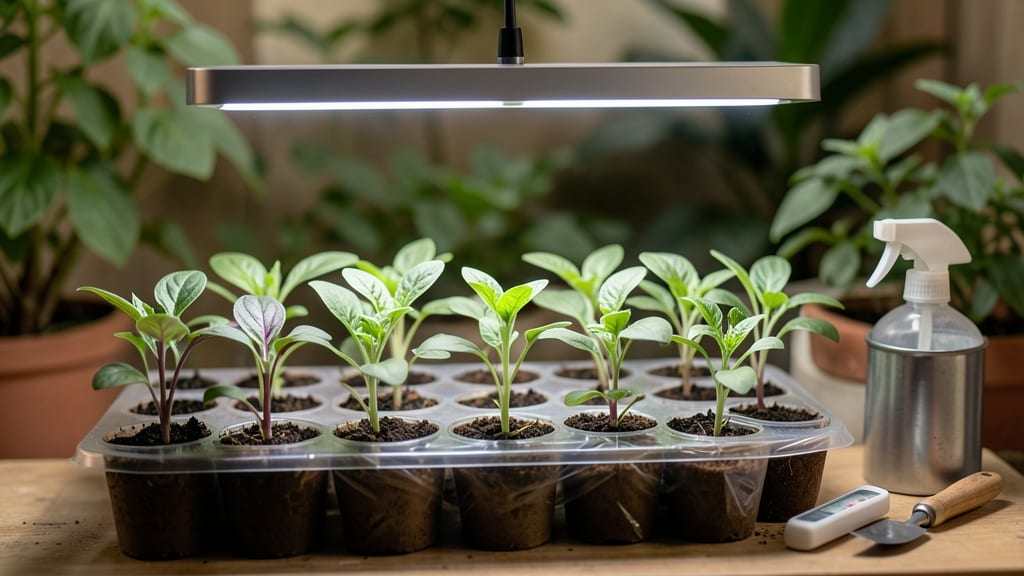
A seed starting kit with light turns your kitchen counter into a nursery that outpaces any store-bought seedlings. 🌱 I’ve used mine for three seasons now, and the difference between these sturdy starts and the leggy, weak ones from big-box stores is night and day.
The right setup gives you control over light, warmth, and moisture—no more praying for sunny windows or guessing when to transplant. The secret isn’t expensive gear—it’s matching your kit to your space.
A basic LED grow light (even a 12-inch model) works wonders for 6-8 trays, and most kits include everything from seed-starting mix to humidity domes. You’ll avoid the common pitfalls: overwatering, uneven light, and seedlings that stretch toward the window like sun-starved teenagers.
Within three weeks, you’ll see thick, dark-green seedlings ready to outcompete anything at the nursery. The light keeps them stocky, the trays prevent root tangles, and the whole process feels like cheating—until you realize you’ve just mastered the early growing season. No more bolting lettuce or floppy basil.
Works for tomatoes, peppers, herbs, or flowers—just adjust the light height as they grow. Here’s how to set it up right the first time.
📚 In This Guide
- What you need
- Instructions
- Tips and common mistakes
- Wrapping up and next steps
What you need
- ● Seed starting trays: 10x20-inch plastic or biodegradable trays (1–2 trays, depending on seed volume)
- ● Seed starting mix: 1–2 bags (1–2 cubic feet) of sterile, well-draining potting mix (avoid garden soil!)
- ● Seeds: Choose fast-growing varieties (e.g., lettuce, basil, or herbs) or follow your kit’s seed list
- ● Grow lights: 1–2 LED or fluorescent full-spectrum bulbs (12–16 inches above trays, 12–16 watts per tray)
- ● Light fixture or stand: Adjustable height (e.g., a simple shelf or DIY frame)
- ● Misting bottle or spray nozzle: For gentle watering (avoid oversaturation!)
- ○ Humidity dome or plastic wrap: 1 per tray (optional but helpful for moisture retention)
- ● Labels & markers: To track seed types and planting dates
- ● Heat mat: For cold-weather starts (e.g., 65–75°F range)
- ● pH testing kit: To monitor soil acidity (ideal: 6.0–7.0)
- ● Fertilizer (low-dose): Water-soluble starter fertilizer (follow label instructions!)
- ● Timer: For grow lights (14–16 hours of light/day)
- ● Tweezers or seedling pickers: For delicate transplanting
Step-by-Step instructions for growing strong seedlings indoors
Skip the trial-and-error—here's how to use a seed starting kit with light for foolproof, healthy starts.
🌱 Step 1: Set Up Your Grow Light Properly
Unpack your seed starting kit and position the grow light 2-3 inches above the seed trays. Most kits include adjustable arms, so you can lower it as seedlings grow. I always test the light first by holding my hand underneath—if it feels warm but not hot, the distance is right. Warmth signals proper light intensity without burning tender leaves.
Plug in the light and run it for 12-16 hours daily, mimicking natural daylight. Set a timer if your kit doesn't have one built in—consistent light prevents leggy, weak seedlings. You'll notice the difference immediately: plants under proper light grow sturdy and compact, while those with inconsistent light stretch toward the source like they're reaching for a handshake.
💧 Step 2: Prepare and Plant Your Seeds Correctly
Fill the seed trays with the included growing medium to just below the rim, leaving ½ inch of space at the top. Press lightly to settle the mix without compacting it—you want it fluffy enough for roots to push through easily. I like to use a spray bottle to moisten the medium until it's damp like a wrung-out sponge, not soggy.
Follow the depth guidelines on your seed packets (usually twice the seed's diameter) and plant 2-3 seeds per cell if your kit allows. Thin later to the strongest seedling. Cover lightly with more medium and mist again. The goal is even moisture without displacing seeds—you'll know you've got it right when the surface looks slightly darker but not glistening.
☀️ Step 3: Maintain Ideal Conditions for Germination
Place the trays under the grow light immediately after planting. Most seeds need 70-75°F soil temperature to germinate—your kit's light should provide this warmth. Check daily for moisture, misting only when the surface feels dry to the touch. Overwatering now is the fastest way to invite damping-off, a fungal disease that collapses seedlings overnight.
You'll see the first sprouts in 5-14 days, depending on the plant. Watch for the moment when green shoots push through the soil—that's when you know your setup is working. Remove the humidity dome (if your kit has one) once 50% of seeds have sprouted. This prevents mold while still keeping humidity high enough for tender roots.
🌿 Step 4: Care for Seedlings Through Early Growth
Once seedlings emerge, lower the grow light to 1-2 inches above the tallest plants. Raise it again as they grow to maintain that distance. You'll notice strong seedlings have dark green leaves and thick stems—these are ready for the next stage. Thin to one seedling per cell by snipping the weakest at soil level with scissors, leaving the strongest.
Water from below now by adding water to the tray's reservoir (if your kit has one) or gently at the base. This encourages deep root growth instead of surface roots that dry out fast. You'll know your watering is right when the soil surface looks slightly dry between waterings but never bone-dry or soggy.
⏰ Step 5: Prepare for Transplanting Outdoors
About 2-3 weeks before your last frost date, start hardening off your seedlings. Move them outside to a shaded spot for 1-2 hours the first day, gradually increasing time each day. Your kit's grow light will help them adjust—strong starts recover faster from transplant shock. You'll see them toughen up when they stop wilting and their leaves perk up after a full day outside.
Transplant on an overcast day or in the late afternoon to reduce stress. Water deeply after planting to settle the soil around roots. With your seed starting kit's light, you'll have healthy, robust seedlings ready to thrive in the garden—no guesswork, just growth.
Tips & tricks for perfect seedling growth indoors
A few simple tweaks can transform your seed starting kit into a seedling powerhouse. Here's what I've learned after years of growing strong starts.
Light Distance Matters: That initial 2-3 inch distance from Step 1 is crucial, but don't forget to adjust it as seedlings grow. I lower my light to just 1-2 inches above the tallest plants once they emerge in Step 4. The key is keeping the light close enough to prevent stretching but not so close it burns tender leaves. Watch for leaves that look pale or crispy at the edges—that's your sign to raise the light immediately.
Soil Temperature is Everything: The instructions mention 70-75°F soil temperature for germination, but here's the trick: your grow light should maintain this warmth without you needing a heat mat. Place a thermometer in the soil to monitor—if it's consistently below 70°F, move the light slightly closer (just an inch or two) to boost warmth. Cold soil slows germination dramatically, sometimes by days.
Thinning Technique: When it's time to thin to one seedling per cell in Step 4, I use a pair of clean, sharp scissors to snip at soil level rather than pulling. This prevents disturbing the roots of the remaining seedling. Work quickly to minimize stress on the plants. You'll know you've done it right when the cut seedling comes out cleanly without pulling up its neighbor.
Hardening Off Hack: For Step 5, I start hardening off my seedlings during the last 2-3 hours of their daily 12-16 hour light cycle. This gradual transition mimics natural daylight patterns and helps them adjust more smoothly. On cloudy days, you can extend the outdoor time since there's less risk of sunburn during this adjustment period.
Pro Tips for Seed Starting Kit With Light
- A few simple tweaks can transform your seed starting kit into a seedling powerhouse.
- Light Distance Matters: That initial 2-3 inch distance from Step 1 is crucial, but don't forget to adjust it as seedlings grow.
- Soil Temperature is Everything: The instructions mention 70-75°F soil temperature for germination, but here's the trick: your grow light should maintain this warmth without you needing a heat mat.
Frequently asked questions
Got questions about seed starting kits with light? You’re not alone—growing strong seedlings indoors can feel like a puzzle! Here are answers to the most common queries to help you grow with confidence.
What’s the best time of year to start seeds with a light kit?
Most gardeners begin 6–8 weeks before the last frost date in their zone. For example, if your frost date is May 15, start seeds around March 1–15. Early starters (like tomatoes or peppers) need more time, while fast growers (lettuce, herbs) can wait until 4–6 weeks out.
Do I need a fancy grow light, or will a regular bulb work?
A basic LED bulb can work for short-term seedling growth, but a full-spectrum grow light (like those in seed-starting kits) provides the perfect balance of red and blue light for strong stems and healthy leaves. Avoid incandescent bulbs—they generate too much heat and little light.
How close should the light be to my seedlings?
Start with the light 2–3 inches above seedlings, then adjust as they grow. Aim for 12–16 hours of light daily. If leaves stretch (a sign of light hunger), lower the light by 1–2 inches. Pro tip: Use a small ruler or clip to mark height adjustments and avoid burning tender shoots!
My seedlings look leggy—what went wrong?
Leggy seedlings usually mean too little light or too much distance from the source. Fix it by:
- Moving the light closer (1–2 inches)
- Increasing light duration to 14–16 hours/day
- Thinning crowded seedlings for better airflow
If they’re already stretched, bury them deeper when transplanting—the extra stem will root!
Are DIY light setups cheaper than buying a kit?
Yes! A DIY setup (like a T5 LED bulb + reflective tray) can cost $30–$50, while kits range from $50–$150. However, kits often include humidity domes, trays, and timers, saving you time and hassle. Weigh your budget against convenience—both work!
Wrapping up and next steps
Starting seeds with a seed starting kit with light takes the guesswork out of growing strong, healthy plants indoors—no green thumb required! 🌱 With the right setup, you’ll enjoy faster germination, robust seedlings, and a head start on your garden.
Whether you’re a beginner or a seasoned gardener, this method makes nurturing your plants effortless and rewarding.
Now that you’re armed with the knowledge, why not take the next step? Grab your kit, pick your favorite seeds, and start your indoor garden journey today. Happy growing—your future harvest is waiting! 🌿