
Lawn
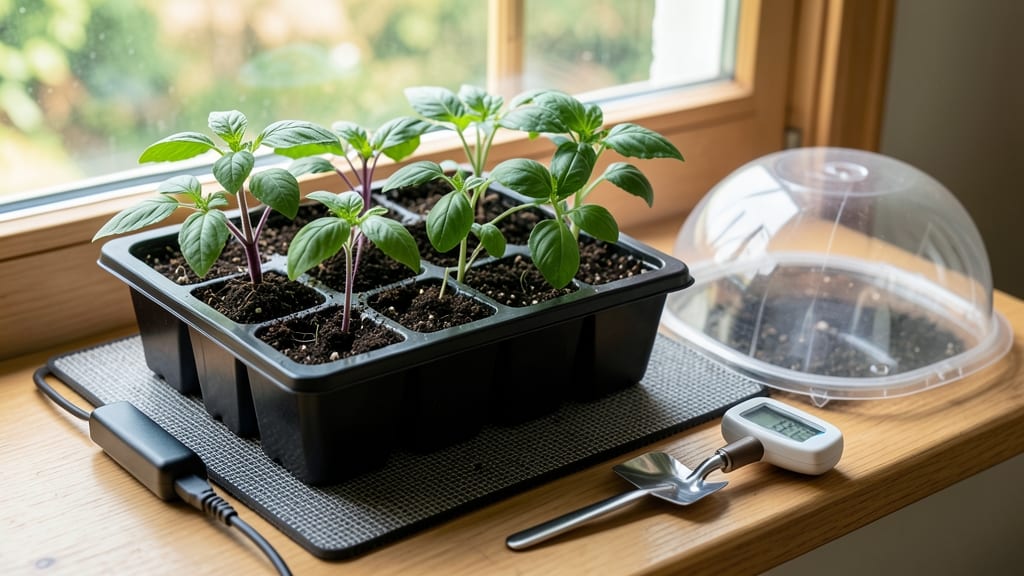
A seed warming mat cuts germination time in half—sometimes even faster. 🌱 I’ve used mine to go from weeks of waiting to seeing sprouts in just days, especially with slow starters like tomatoes and peppers. The secret? Consistent warmth that mimics spring’s natural soil conditions without the guesswork.
Most mats keep seeds at a steady 70-85°F, but some plants—like lettuce—prefer cooler 60-70°F. Plug it into a timer for 12-16 hours daily to avoid overheating, and always place a moisture meter nearby to track soil dampness.
My first batch of peppers emerged in 5 days instead of the usual 2 weeks.
You’ll skip the "waiting game" and move seedlings outdoors earlier, giving them a head start on the growing season. The mat also prevents the temperature swings that cause uneven germination or mold. Just avoid placing it under grow lights—heat and light together can dry seeds too quickly.
For beginners, it’s simpler than bottom watering or heat lamps, and it works under fluorescent lights too. Pair it with a humidity dome for extra speed, and you’ll have sturdy seedlings ready for transplanting in record time.
📚 In This Guide
- What you need
- Instructions
- Tips and common mistakes
- Wrapping up and next steps
What you need
- ● Seed warming mat: 1 x Electric seed warming mat (or a DIY alternative like a heating pad rated for low heat, ~70–85°F)
- ○ Optional: A thermostat-controlled mat for precision (e.g., blank">Vivosun or blank">GQ Electron models).
- ● Growing trays or containers: 1–3 x Seed trays with drainage holes (10"x20" or custom size, depending on seed volume)
- ○ Optional: Clear plastic domes or humidity lids to retain moisture.
- ● Growing medium: 1 bag (1–2 cu. ft.) of seed-starting mix (sterile, peat-based or coco coir blend)
- ○ Optional: Perlite or vermiculite (1 part) to improve aeration.
- ● Seeds: Your chosen seeds (check packet for specific germination temp requirements).
- ● Miscellaneous: Spray bottle (for gentle watering)
- ● Plastic wrap or breathable cloth (to cover trays temporarily)
- ● Timer (to monitor warming mat cycles, if applicable)
- ○ Optional: pH testing kit (to ensure soil is 6.0–7.0 for optimal germination).
How to use a seed warming mat for faster germination
Here's the straightforward method I rely on to cut germination time nearly in half.
🌱 Step 1: Select the Right Seed Warming Mat
Look for a mat with a built-in thermostat set to 75-85°F—this range is optimal for most vegetable seeds. I prefer mats that plug directly into standard outlets rather than requiring adapters, as they're more reliable. The mat should be large enough to accommodate all your seed trays at once, typically covering 12x24 inches for most home setups.
Check the wattage—100-150 watts is ideal for consistent heat without overheating. Place the mat on a flat, stable surface like a countertop or table, ensuring it has at least 2 inches of clearance around the edges for airflow. Never place it near drafts or direct sunlight, as temperature fluctuations can stress delicate seeds.
💧 Step 2: Prepare Your Seed Trays and Moisten Soil
Fill your seed trays with sterile seed-starting mix (never garden soil) up to 1 inch below the rim. Press the soil down gently to remove air pockets, then moisten it thoroughly with lukewarm water until it feels like a damp sponge. Overwatering here is better than underwatering—you want the soil to stay consistently moist but not soggy.
Sow your seeds according to packet instructions, then cover them lightly with a thin layer of soil (usually ¼ inch deep). Mist the surface gently with a spray bottle to settle the soil without disturbing the seeds. Place the trays on the warming mat and position the thermostat probe so it sits ½ inch deep in the soil—this gives you an accurate reading of root-zone temperature.
☀️ Step 3: Maintain Consistent Heat and Humidity
Turn on the warming mat and set the thermostat to 78°F—this is the sweet spot for most seeds. You'll notice the mat stays warm to the touch but never scorching, which is normal. Cover the trays with a clear plastic dome or plastic wrap to trap humidity, but leave a small gap for airflow. Check the soil moisture daily—it should feel damp but not wet.
Germination speed varies by seed type, but you'll typically see sprouts in 5-10 days (compared to 10-21 days without heat). Once 50% of seeds have sprouted, remove the dome immediately to prevent damping-off. Keep the trays on the mat until seedlings develop their first true leaves, then transition them to a grow light setup.
⏰ Step 4: Transition Seedlings to Ambient Conditions
After 7-10 days on the mat (or when seedlings show 2-3 true leaves), gradually reduce heat exposure. Turn off the mat for 2 hours daily, increasing the duration by 30 minutes each day until the seedlings tolerate room temperature. This process, called "heat acclimation," prevents shock when they move to cooler growing conditions.
Once seedlings are fully acclimated, transfer them to a grow light or sunny windowsill (6+ hours of light daily). The warming mat's job is done—its real magic was jumpstarting those slow-to-germinate seeds. Keep an eye on seedlings for the first week post-transition; any that look leggy or pale need more light immediately.
Tips & tricks for perfect seed germination with a warming mat
Here's what nobody tells you about maximizing those first critical days of seed growth.
Temperature Precision: The 75-85°F range in Step 1 is your golden zone, but don't assume all seeds thrive equally. Delicate seeds like lettuce prefer the lower end (75-78°F), while peppers and tomatoes can handle up to 82°F. I keep a small thermometer probe in the soil to verify the exact temperature—some mat models can have hot spots that stress seedlings.
Soil Moisture Secret: In Step 2, when you're checking soil moisture, think "damp sponge" not "wet towel." Overwatering creates anaerobic conditions that prevent germination. I use a spray bottle to mist the soil surface daily rather than watering from above—this keeps the seed bed consistently moist without displacing seeds or creating puddles that could cause rot.
Humidity Management: The plastic dome in Step 3 creates a greenhouse effect, but too much humidity breeds mold. After those first 5-10 days, I crack the dome open slightly for 10 minutes daily to refresh air circulation. This prevents damping-off while maintaining the warm, humid environment seeds crave during germination.
Transition Timing: Don't rush the 7-10 day heat acclimation in Step 4. I've seen seedlings collapse after abrupt temperature changes. Start with just 2 hours off the mat daily, then increase gradually. Watch for leaves that perk up when the mat's off—this is your signal they're ready for full acclimation.
Pro Tips for Seed Warming Mat
- Here's what nobody tells you about maximizing those first critical days of seed growth.
- Temperature Precision: The 75-85°F range in Step 1 is your golden zone, but don't assume all seeds thrive equally.
- Soil Moisture Secret: In Step 2, when you're checking soil moisture, think "damp sponge" not "wet towel."
Frequently asked questions
Got questions about seed warming mats? You’re not alone!
Whether you’re a first-time gardener or a seasoned green thumb, these answers will help you maximize your mat’s potential and troubleshoot common hiccups. Let’s dive in!
How long should I keep seeds on a warming mat before planting?
A warming mat typically speeds up germination in 3–7 days for most seeds, depending on the type (fast germinators like lettuce may sprout in 3–5 days, while slower ones like beans take 7–10). Avoid over-warming—once seeds sprout (tiny roots or shoots appear), remove them immediately to prevent leggy or stressed seedlings. Check your seed packet for specific timing!
Can I use a warming mat for all types of seeds?
While warming mats work wonders for cool-season crops (like tomatoes, peppers, and herbs), they’re not ideal for tropical seeds (e.g., avocado or citrus), which prefer heat after germination. For delicate or heat-sensitive seeds (like some flowers), opt for a low setting (65–75°F) or use a seedling heat mat designed for gentle warmth.
What if my warming mat isn’t working? Troubleshooting tips!
If your mat feels cool to the touch or seeds aren’t sprouting:
- Check the power source: Plug it directly into a wall outlet (not a power strip) and test with a multimeter if possible.
- Inspect for damage: Look for frayed cords or uneven heating—replace if needed.
- Adjust humidity: Cover seeds with a humid dome or plastic wrap to trap moisture (but avoid soggy soil!).
- Try a higher setting: Some mats have adjustable heat; start at 70–75°F for most veggies.
Still stuck? Contact the manufacturer—many offer warranties or replacements!
Are warming mats worth the investment compared to other methods?
if you’re serious about fast, reliable germination! While DIY methods (like a bottom-watering tray with a heating pad) work, a dedicated warming mat offers consistent, even heat and is safer than makeshift solutions (e.g., radiators or lamps). For $20–$50, it’s a game-changer for early starts or slow-germinating seeds—especially in cool climates.
How soon can I transplant seedlings after using a warming mat?
Once seedlings have 2–3 true leaves (not just the initial sprouts) and a sturdy root system, they’re ready for transplanting—usually 1–2 weeks after germination. Harden them off by placing them in a shady, outdoor spot for 3–5 days before moving to their final home. Avoid transplanting on hot or windy days to reduce shock!
Wrapping up and next steps
Ready to unlock faster, healthier sprouts with minimal effort?
A seed warming mat is your secret weapon for a head start on the growing season—whether you're a seasoned gardener or just dipping your toes into green thumbs. 🌱✨ The key takeaway? Consistent warmth and moisture are the dynamic duo for breaking dormancy, and this tool makes it effortless.
Now that you’re armed with the how-tos, FAQs, and pro tips, why not grab a warming mat today and watch your seeds sprout in record time? Happy planting—your future garden will thank you! 🌿💚